I thank my God upon every remembrance of you. Philippians 1:3
I just adore flowers – especially the old-fashioned flowers that women have been growing for ages. Sometimes you can tie these old-fashioned beauties to a time, place or person. MEMORIES! Sweet peas always remind me of my grandma -- she had a huge hedge of them growing near her clothesline and hollyhocks remind me of a sweet, elderly neighbor lady from when I was a little girl and my family lived in the BIG farmhouse (the first farmhouse I loved), before moving to the burbs and into a tract home (okay, that was 1972 and I still am sad about that, lol) – her hollyhocks were giants in her yard and beautiful against her PINK farmhouse – those flowers and her house simply mesmerized me.
My sweet friend Sharon from A Merry Heart Journal put out the word that she had hollyhock seeds available to gift – she sent me the most precious package of them. I will be planting them this weekend in a little bed on the west side of my garage. I edged and tilled that bed this last spring but never did get it planted – now I know why – it was supposed to be for Miss Sharon’s hollyhocks!
The act of sharing seeds, cuttings and divisions of your flowers is a very special thing ---- women have this done forever – passing on their beautiful blooms and prize winning garden goodies. I will share seeds from these hollyhocks when they become available. Thank-you Sharon for such a precious gift! Everytime I see those blooms, I will think of and pray for you. Do you have something to share with a friend or a neighbor -- seeds from something sweet or something needing dividing?
photo credit: BH&G
Growing Hollyhocks ~ Fall Planting
1). Sow the hollyhock seeds directly into the flower bed. The area must receive at least six hours of direct sunlight each day. Plant the seeds 1/4 inch deep.
2). Water the seeds well and keep the soil moist until the hollyhock seeds germinate. Thin out unwanted plants or transplant to another garden area. Continue watering at least once a week.
3). Cut back the hollyhock stalks to ground level after the first frost hits. The roots will continue to grow and establish into a good root system for spring.
4). Mulch the new plants to protect them from the winter. Remove the mulch in the spring to allow the hollyhocks to sprout easily.
5). Maintain a biweekly watering schedule for the hollyhocks in the spring. Either deadhead the flowers as they die or allow the hollyhock to drop the seeds and self-seed the area for new plants the following growing season.
Tuesday, August 30, 2011
Monday, August 29, 2011
Farmer's Market Report & Roasted Eggplant Parmesan
What was available at Farmer's Market this week? Well, there was cantaloupes and watermelons, potatoes, red and green peppers, sweet corn, green beans, tomatoes, honey, baked goods (the last week for our bakery folks -- we'll miss you) AND EGGPLANT.
Have you tried eggplant lately? You should.
Called aubergine in France, eggplant is a member of the nightshade family of vegetables, including tomato and potato. Known for its characteristic taste as well as texture, eggplants are best enjoyed between August and October. This much-overlooked vegetable is loaded with all kinds of health benefits. Eggplant’s fiber content is high, which helps our digestive process and acts against coronary heart disease. Eggplants are loaded with a number of vitamins, proteins and minerals (including Potassium which helps balance salt intake for us and helps regulating blood pressure), they also contain important phytonutrients. All that said, you should run not walk to buy yourself an eggplant and try it today.
Choose eggplants that are firm and heavy for their size. Their skin should be smooth and shiny, and their color, whether it be purple, white or green, should be vivid. They should be free of discoloration, scars, and bruises, which usually indicate that the flesh beneath has become damaged and possibly decayed. The stem and cap, on either end of the eggplant, should be bright green in color. To test for the ripeness of an eggplant, gently press the skin with the pad of your thumb. If it springs back, the eggplant is ripe, while if an indentation remains, it is not. Place uncut and unwashed eggplant in a plastic bag and store in the refrigerator crisper where it will keep for a few days. Do not cut eggplant before you store it as it perishes quickly once its skin has been punctured or its inner flesh exposed.
Many (maybe even most) eggplant recipes call for breading and frying. Those recipes are wonderful BUT do not fit in with my way of eating. Healthier ways of preparing eggplant are equally yummy and this one is not fussy to make and can be made ahead (isn't that a huge help on busy weeknights?). Serve this on the side of grilled meats OR combine with a salad and some crusty bread as a meatless meal.
Roasted Eggplant Parmesan
(Printable Version)
2 medium eggplants (about 2 pounds)
1 tablespoons coarse salt
2 tablespoons olive oil
1 cup ricotta cheese
¾ cup mozzarella (divided)
1 tablespoon chopped parsley
1 tablespoon chopped basil
1-½ cups marinara sauce (divided)- I make this from my fresh tomatoes and herbs
2 tablespoons parmesan cheese
Heat oven to 450°F. Trim stems and ends from eggplant and peel, leaving several 1-inch wide strips of peel intact. Cut the eggplant lengthwise into ½-inch thick slices and place in a colander. Sprinkle with salt and allow to sit for 15 minutes. Rinse the eggplant under cool water, drain thoroughly and pat dry. Toss the slices in the olive oil and place on 2 baking sheets. Bake 20 minutes until golden brown. Let cool. Reduce oven heat to 350°F. In a small bowl, combine ricotta cheese, ½ cup mozzarella cheese, parsley and basil. In an 8 x 8 baking dish, spread ½ cup of marinara sauce on the bottom of the pan. Place a layer of eggplant slices in the dish and spread ½ cup of the cheese mixture on top; repeat, layering 2 more times. Top with remaining (1 cup) marinara sauce and sprinkle the remaining (¼ cup) mozzarella cheese and parmesan cheese on top. Cover loosely with aluminum foil. Bake at 350°F for 30 minutes; remove aluminum foil and bake another 10-15 minutes or until cheese is melted and slightly golden brown. Cool slightly and serve.
Do ahead: Cover the unbaked Roasted Eggplant Parmesan with aluminum foil and refrigerate up to 24 hours. You may need to bake covered 10-15 minutes longer or until bubbly. Uncover and bake another 10 minutes or until slightly golden brown.
Posting to Yvonne's On The Menu Monday!
Thursday, August 25, 2011
Old-Fashioned Bake Sale ~ Grandma's Apple Butter Cake & Welcome Home Brands & A GIVEAWAY!!!!
A few weeks ago I was at the mall with #1 daughter. We strolled through Auntie Em's. I LOVE going in there but found an unexpected treat on that day -- Paper Bakeware from WELCOME HOME BRANDS. I purchased some of the little loaves and muffin tops and brought them home and used them almost right away. Oh, I just loved not only the convenience of the product BUT how lovely my baked goodies looked in these sweet papers. I found the company webpage and sent them an email asking for (read that UNASHAMEDLY BEGGING for) some more of their wonderful product for review AND giveaway to my lovely readers. They quickly sent me out a sampling of their wonderful products and something special for the giveaway. All I can say, is you gotta get yourself some for fall and holiday baking -- they are perfect for your baking that is intended for gift giving and of course they'd be PERFECT for bake sale goodies! Very convenient....no pans to prepare or clean up after......keeps the messies out of baking. Thank you WELCOME HOME BRANDS! Wonderful, wonderful products!! If there is not a retailer in your area that sells these great products, they are available at Amazon.
My Grandma Mae was a BAKER EXTRAORDINAIRE! Her specialty was cakes. I remember people always commenting on how she made the BEST cakes. One of her specialties was what she called Applesauce Cake -- it was always my Mom's favorite cake. I don't have Grandma's actual recipe since ALL of her recipes were in her head but I've made my own version that Mom says it is just about as good. Mom and I both know Grandma's secret ingredient -- APPLE BUTTER!!
Grandma Mae’s Apple Butter Cake
(Printable Version)
1 pkg yellow cake mix (without pudding in the mix)
1 pkg (4 serving size) vanilla instant pudding mix
3 eggs
1 cup sour cream
1 cup apple butter
1 stick butter, melted
¼ c water
2-3 tsp apple pie spice (see recipe below)
1 cup pecans, toasted (optional)
Preheat oven to 375°F. Spray 10-inch tube pan with nonstick cooking spray. Beat cake mix, pudding mix, eggs, sour cream, apple butter, water, melted butter, nuts and spice in large bowl with electric mixer at low speed 1 minute. Beat at medium speed 2 minutes or until well blended and fluffy. Pour batter into prepared pan. Bake 45 to 50 minutes or until toothpick inserted near center comes out clean. Cool in pan on wire rack 20 minutes. Run sharp knife along edge of pan to release cake from pan; invert cake onto serving plate. Cool completely.
I have baked this cake in layers (if you remember last year when I made my Mom & Dad’s 50th Anniversary Cake – it was THIS cake) and in loaves. It is very versatile – you will have to adjust the baking time accordingly. To serve, you can simply sprinkle with powdered sugar, dollop with fresh whipped cream, ice or glaze with a simple glaze or vanilla buttercreme BUT my favorite is icing it with cream cheese frosting Y-U-M!!!
Apple Pie Spice
(Printable Version)
1/4 cup ground cinnamon
1 tbsp ground allspice
2 tsp ground nutmeg
1/2 tsp ground cardamom (optional)
Pumpkin Pie Spice
(Printable Version)
1/4 cup ground cinnamon
2 tbsp ground ginger
2 tsp ground cloves
1 tsp ground nutmeg
1/2 tsp ground cardamom (optional)
Combine all ingredients for desired mix and blend well. Store in a small, airtight container. Feel free to experiment with amounts to get a blend that works for you.
So, now the important stuff, GIVEAWAY TIME!! This is a celebration giveaway. What are we celebrating? -- well, let's see -- August is the 2 Year Anniversary of Faithfulness Farm -- 300 Posts (okay, I am at 298 posts but close enough, lol) -- and MOST IMPORTANTLY, My LOVE of BAKING!!
Here are the details of the Old-Fashioned Bake Sale Giveaway -- it includes 2 packages of WELCOME HOME BRANDS products, a Faithfulness Farm Vintage-Inspired Apron and Set of Embellished Dish Towels, a little mason jar of both the Apple Pie & Pumpkin Pie spice mixes and The Bake Sale Cookbook (isn't that just perfect). You have 3 EASY opportunities to enter -- 1. Comment on this post (remember to leave a email address so I can contact you), 2. Follow Faithfulness Farm Blog (let me know in a separate comment that you follow) AND 3. Blog about Old-Fashioned Bake Sales and this giveaway (let me know that in separate comment too). We'll have a drawing of all the entries and announce the winner on LABOR DAY September 5th!
Editing to participate in my dear friend Yvonne's On The Menu Monday Party!!
Wednesday, August 24, 2011
Preserving Your Summer Herbs
Fresh is BEST -- especially when we're talking herbs. I enjoy my fresh herbs from the garden all summer long....but all good things come to an end. As my mind starts to turn to fall, I know that the goodness of my fresh herbs will be ending......but I'll have wonderful reminders of all that fresh goodness -- preserved herbs! There are several methods of preserving and depending on what herbs you are wanting to keep will determine how to preserve. Some things to remember, an herb's flavor is most pronounced just before the plant begins to flower. You can prolong the harvest by snipping off the flower buds whenever they appear. The essential oils are concentrated in the leaves in early morning, before the sun causes them to be released into the air. Early morning is, therefore, the best time to harvest. Snip individual leaves or cut an entire shoot just above a leaf node (this will encourage dormant buds to grow at the nodes for a bushier plant). Harvest the seeds of dill, fennel, and coriander when the flower heads have faded and started to dry. Clip the flower heads and place them in paper bags, then shake the heads to dislodge the seeds. Store seeds in an airtight container.
Drying: Many herbs can be air dried by tying several stems together with a rubber band and hanging them in a cool, dark, dry location. Bay, marjoram, oregano, parsley, rosemary, sage, and thyme are good candidates for drying. If the area is dusty, keep the herbs in paper bags during the drying process. Parsley and thyme retain more of their color if they are dried in a 150-degree oven or in a dehydrator. When leaves are brittle, pull them off the stems and store in airtight jars in a cool, dark place. Don't crumble the leaves until you use them because they will lose flavor. Dried herbs keep their flavor and color for about three months.
Freezing: Some herbs keep their flavor best when frozen. These include basil, chives, chervil, dill, lemon balm, mints, oregano, parsley, rosemary, sage, French tarragon, thyme, and lemon verbena. Wash them thoroughly and shake or pat off the excess water. Place individual leaves or chopped leaves in freezer bags. Flatten the bags to remove air. Dill, sage, rosemary, and thyme also freeze well on the stalks, which you can add frozen to cooking pots and remove before serving.
You can also puree herbs with a small amount of water and freeze the paste in small, zippered freezer bags. Then break off frozen pieces as you need them. Combine herbs that are good culinary companions, such as sage and thyme, mix with a little olive oil, and seal the paste in freezer bags. Or pour the mixture into ice cube trays. Once frozen, remove and store in freezer bags and thaw individual cubes as needed.
Every cook should have these top ten basic culinary herbs within his or her reach, fresh or preserved. If you don't grow herbs or not all of these anyway, check with your local Farmer's Market.
Basil – Use in pesto (which freezes beautifully), Italian sauces, soups and stews.
Dill – Not just for dill pickles, use in cottage cheese, cream cheese, goat cheese, omelets, seafood (especially salmon), potato salad and breads.
Chives – Great in everything from eggs to potatoes.
Cilantro – Essential ingredients for any salsa.
Mint – Fabulous with beverages like teas and lemonade, desserts with chocolate or with lamb.
Oregano – Great in Italian sauces , soups, and stews and a must have for greek salads.
Parsley – Blends flavors, adds color, and garnishes any dish beautifully - grow both curly and flat-leaf.
Sage – Primarily used in sausages and turkey stuffing -- must have for Thanksgiving!
Tarragon – Used in fish, omelets, and chicken cooked with mustard, and it’s a crucial component of Bearnaise sauce -- disclosure: NOT my favorite although I grow some because I like the scent I don't bother with stocking it in my pantry.
Thyme – French herb primarily used in beef burgundy, soups and stews also perfect for seasoning poultry and pork. I love the *flavored* thymes you can grow.
Editing to include in my dear friend Yvonne's On The Menu Monday Party!!
Saturday, August 20, 2011
Don't It Make My Brown Eyes Blue
This subject is a bit of a departure from my normal subject matters although it certainly falls into the catagory of FRUGAL or HOMEMADE which is always me. A few weeks ago I was reading Kim's Marmee's Pantry blog. Kim writes a lot about natural and homemade products. She is a wealth of knowledge on these subjects. Her post on eye make-up removal got my full attention -- expecially when I read *we should NOT use oily eye make-up removers b/c they leave a little bit of oil on your eyes w/every swipe. And, after a while, the only way to truly clean it off is w/eye surgery*. YIKES!! That hit home -- I've used baby oil to remove eye makeup FOREVAH. Well, that had to stop and stop that very day!! I set out to try the 3 listed homemade alternatives that Kim suggested. I didn't have the ingredients on hand for #1 or #2 so I skipped to #3 -- *Simply dip a cotton ball in a small saucer of milk (preferably raw) OR yogurt & LIGHTLY work around your closed eyes & eye lashes. ~GENTLY wipe off w/a tissue using your ring finger.* I found this method to be very refreshing and cooling and it did a great job of removing the makeup. Problem is we're not a huge milk family and I don't always have milk available.
On my next trip to the BIG BOX store, I had the ingredients for the other 2 suggestions on my list. After pricing the ingredients for both #1 and #2, I decided to skip straight to #2 and only attempt #1 if I was unhappy with the results of #2. Well, I will have to believe Kim that #1 is effective, I LOVE #2 and do not plan to look further or go back to any other method used over the years.
#2 Eye Make-Up Remover
1 part gentle, unscented baby shampoo
10 parts water
~Mix together in a clean bottle (a clean, used one is fine)
~Shake before using
~Using a cotton ball or cotton pad, LIGHTLY apply & LIGHTLY work around your closed eyes & eye lashes
~GENTLY wipe off w/a tissue
After this great success I plan to try Kim's formulas for Homemade Eye Serums & Gels . THANKS Kim -- from me and my BROWN eyes!!
Linking up to Susan's Metamorphosis Monday!
Thursday, August 18, 2011
Old-Fashioned Bake Sale ~ A Little Help From My Friends
Remember the old Beatles song ---
Oh, I get by with a little help from my friends,
Mmm, gonna try with a little help from my friends
Yes I get by with a little help from my friends,
with a little help from my friends...........
This week got away from me with no baking AT ALL. Here I go offering excuses....I think it a good excuse, but still an excuse, lol...my sweet friend at work was getting her daughter ready to go off to college so I covered for her and worked more hours than I planned to (and didn't take my usual Thursday off). I had plans to do a wonderful (baking) product review and kick-off my giveaway (which will include aformentioned (baking) product). SO, instead of rushing thru, I am working on that post for NEXT Friday and this week am going to share what my SWEET friends have baking in their kitchens. All of these gals are top-notch bakers and these recipe all would be perfect for bake sale fare or a sweet treat for your family and friends!
Thank you Kim, Lynn, Linda, Tina and Linda! Be sure to check in with me next friday for a great product review, a 2011 update of one of my Grandma's tried and true recipes AND a giveaway!!
Chocolate Chip Cheesecake from Kim @ A Well-Seasoned Life
Lemon Zucchini Bread from Lynn @ Happier Than A Pig in Mud
Oreo Cupcakes From Linda @ Lemon Drop
White Chocolate Cherry Sweet Bread from Tina @ Mommy's Kitchen
Apple Slab AND
Strawberry Lemonade Scones from Linda @ Prairie Flower Farm
More Farmer's Market
Our local newspaper has noticed the popularity of our Farmer's Market(s). Two farmer's markets flourish in Hastings. Yay for Farmers and for Farmer's Markets!!
A tip from my favorite Farmer's Market cookbook -- Gooseberry Patch's Farmer's Market Favorites (that is using the word FAVORITE a lot, lol).
Until they're ready for your best recipe, tuck sprigs of fresh herbs into water-filled Mason jars or votive holders for a few days. Not only will they stay fresh longer, they'll look so lovely.
Tuesday, August 16, 2011
What's New!!
Things change -- even at Faithfulness Farm. I thought I'd point out a some of my recent changes.
Firstly, I PIN. I've been enjoying all the inspiration at Pinterest. Check out my Pins. Another addition, I have FINALLY added the email feature -- if you would like Faithfulness Farm posts delivered directly to your email address, simply sign up. I also wanted to point out my *About Me* profile here at Faithfulness Farms. It tells of some big happenings in my life and around Faithfulness Farm. I also wanted to mention that starting the first day of Autumn (my favoritest season of ALL), my new ETSY shop will open for business. Look for that!
Lastly, I thought I'd leave you with this thought.....
"If nothing ever changed, there'd be no butterflies." -author unknown
photo credit: Shane Rucker
Monday, August 15, 2011
GBP's Farmer's Market Favorites
No series on Farmer's Markets would be complete without a mention of my friends at Gooseberry Patch. A couple years ago they published what has become one of my favorite books -- FARMER'S MARKET FAVORITES. Whatever you garden is producing in overdrive or you can pick-up at Farmer's Market at it's peak, you'll find a recipe in this book for putting it on the table. One of my favorite recipes from this book is Summertime Tomato Tart.
Seasonal tomatoes are surely my favorites -- I will hardly ever eat a tomato outside of their season because they are too disapointing. That said, I've had an interesting tomato growing season -- too chilly in spring and then way too hot too early in summer (although we've had plenty of PERFECT the last couple of weeks). All my tiny tomatoes (cherry & grape) have done wonderful -- the rest, not so good. For that reason, I have turned to farmers market for my tomatoes.
If you've never made a tomato tart, you have to make this one. If you use a premade crust, you can have this on your table in no time and with little effort - best of all, this is perfect for brunch, a light lunch, appetizer or as a side for supper.
Summertime Tomato Tart
(Printable Version)
4 tomatoes, sliced
9-inch pie crust
8-oz pkg. shredded mozzarella cheese
2 Tbsp fresh basil, chopped
1/4 c. olive oil
sea salt & freshly ground pepper to taste
Arrange tomatoes in bottom of pie crush. Sprinkle evenly with cheese and basil; drizzle with oil. Bake at 400°F for 30 minutes. Let stand for 5 minutes before slicing. Serves 6.
Friday, August 12, 2011
Kool-Aid Days & Frozen Cherry-Limeade Kool-Aid Pie
It's time to celebrate KOOL-AID DAYS again. Remember me telling you that the town I live in, Hastings, Nebraska's big claim to fame is being the birthplace of KOOL-AID!! I thought in that spirit of celebration, I'd share a couple FUN recipes that use Kool-Aid.
The first one is from my friend over at Our Treasured Home. She recently posted a recipe for Kool-Aid Pickles -- you have to check out that recipe!
Next is a hybrid recipe that I made using a couple different recipes and concepts to make what ended up being a very fun dessert. All thumbs were up for this one (son said they taste very much like cherry-limeade from Sonic, "only better") -- so COOL and refreshing. This would be a great treat to have the kids help you make :)
Frozen Cherry-Limeade Kool-Aid Pie
(Printable Version)
Crust:
1-1/2 cups graham cracker crumbs
6 Tbsp butter, melted
2 Tbsp sugar
Filling:
1 packet unsweetened Cherry Flavored Kool-Aid
1 can (14 oz.) sweetened condensed milk
1/4 cup frozen Limeade concentrate, thawed
2 8 oz. containers Whipped Topping
Topping:
1-1/2 cup heavy whipping cream
1/4 cup powdered sugar
Jar of maraschino cherries
12 (8 oz) half pint canning jars
Preheat oven to 350°F. In a mixing bowl, combine graham cracker crumbs, melted butter, and sugar. Press about 2 heaping Tbsp in the bottom of each jar (divide evenly between the 12 jars). Place jars on a large cookie sheet and bake for 6 minutes. Cool completely. Mix together dry Kool-Aid packet, sweetened condensed milk and Limeade concentrate. Fold in whipped topping. Divide between prepared jars leaving room to place on the lids. Place in freezer for at least 2 hours. Before serving, prepare whipped cream. Combine cold cream and powdered sugar pre-chilled mixing bowl. Beat with whisk attachment until peaks form. Spoon over top of pies and top with a cherry or 2. Serves 12. YUMM-O!!
Thursday, August 11, 2011
Old-Fashioned Bake Sale ~ Banana-Sour Cream Loaf
Cooler temps have me dreaming of lots of wonderful things from the oven. Since I have an ever-growing stash of frozen bananas, I figured I'd share my staple banana bread recipe and bake a favorite of everyone here. The recipe comes from Gooseberry Patch's *Made From Scratch* -- one of my favorite GBP books and this is the moistest banana bread recipe I've ever tried. Besides freezing my over-ripe bananas, I try to have a few loaves of this wonderful bread in the freezer. Comes in handy for quickie hostess gifts or a treat for unexpected company.
Banana-Sour Cream Loaf
(Printable Version)
2/3 c. butter
1-1/3 c. sugar
2 eggs
1-1/2 c. bananas, mashed
2-1/4 c. all-purpose flour
1 tsp. baking powder
1 tsp. baking soda
1/2 tsp. salt
1/2 c. sour cream
1 c. chopped nuts (I ALWAYS use 1 cup mini-chocolate chips instead)
Cream butter and sugar together; add eggs and bananas, beat until smooth. In a seperate bowl, sift flour, baking powder, soda and salt together. Add dry mixture alternately with sour cream to banana mix, blend well. Fold in nuts (or chocolate chips) and pour into a greased 9x5-inch loaf pan; bake at 350°F for 45 minutes. Makes 8 servings.
Wednesday, August 10, 2011
Gooseberry Patch Is Bringing In Autumn -- Quick & Easy!!
ahhh....do you feel that? It is SO MUCH cooler today -- the high temp is supposed to be around 73°. That is about perfect in my book! I know summer has not had it's last hurrah yet, but on a day like today, it is hard for me not to leap ahead to my favorite season -- AUTUMN!! I'm thinking my friends at Gooseberry Patch may be responsible for this sweet autumnal preview. What do you think?
P.S. Did you see the quote from Faithfulness Farm in the video? :)
If you have not got your hands on this sweet cookbook yet, you can order it from Gooseberry Patch and have it in plenty of time for Autumn cooking and baking :)
P.S. Did you see the quote from Faithfulness Farm in the video? :)
If you have not got your hands on this sweet cookbook yet, you can order it from Gooseberry Patch and have it in plenty of time for Autumn cooking and baking :)
Monday, August 8, 2011
Hens, Roos & Chickies Too!
Time to show off your roosters and hens over at Sheila's Heart of the Home Party. I always love a party -- especially a themed party! If you've been following along at Faithfulness Farm, you already know that I like chickens.......A LOT! I took part in Barb's Rooster Parties last year and the year before last.
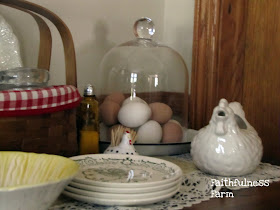
This year, I already had my dining room sideboard all dressed in yard birds so I clicked a few photos and rushed right over to PARTY!! My sideboard is just an old antique chest of drawers that stores my collection of napkins, tableclothes and placemats. A red-checked-lined basket holds 4 *On The Farm* rooster plates from the David Carter Brown Collection (each plate depicts a different regal looking rooster), some red tin stars and a yummy apple scented candle. Chickens LOVE apples!
A stack of some cute vintage transferware plates -- can you believe I found a bowl to match -- I love the yellow on the bowl.
Toothpicks hanging out in a little spotty hen.
A cloche over an enameled pie pan and a collection of brown & white (ceramic) eggs.
Isn't this gravy boat just wonderful? -- I suggest using the ladle though -- his gullet doesn't like giving up the gravy -- I must make thick gravy, lol.
A larger cloche over another enameled pie pan - Mr. & Mrs. Roo under glass!
a small vintage planter with a tiny baby African Violet.
A Roo salt shaker and his Hen pepper shaker on a little tray -- I LOVE all white dishes!
Aren't these just the cutest little Roo and Hen?
Back in the kitchen, there are a couple scary looking vintage fighting cocks overseeing all that goes on. These were garage sale finds and someone had painted them burnt orange -- talk about scary, lol. Nothing a can of black spray paint didn't quickly fix.
Well, I better save something for the next party -- I think I'll put the kettle on to boil.
A BIG Thank-you to Miss Sheila -- such a lovely hostess!!
Saturday, August 6, 2011
From The Hymnal ~ What A Friend We Have In Jesus
On April 27, 2011 the General Assembly of the United Nation declared the first Sunday in August as official International Friendship Day. I can not think of a better friendship to celebrate than the one offered to us by Jesus.
Greater love has no one than this, that he lay down his life for his friends.
John 15:13
What A Friend We Have In Jesus
What a friend we have in Jesus,
All our sins and griefs to bear!
What a privilege to carry
Everything to God in prayer!
Oh, what peace we often forfeit,
Oh, what needless pain we bear,
All because we do not carry
Everything to God in prayer!
Have we trials and temptations?
Is there trouble anywhere?
We should never be discouraged—
Take it to the Lord in prayer.
Can we find a friend so faithful,
Who will all our sorrows share?
Jesus knows our every weakness;
Take it to the Lord in prayer.
Are we weak and heavy-laden,
Cumbered with a load of care?
Precious Savior, still our refuge—
Take it to the Lord in prayer.
Do thy friends despise, forsake thee?
Take it to the Lord in prayer!
In His arms He’ll take and shield thee,
Thou wilt find a solace there.
Blessed Savior, Thou hast promised
Thou wilt all our burdens bear;
May we ever, Lord, be bringing
All to Thee in earnest prayer.
Soon in glory bright, unclouded,
There will be no need for prayer—
Rapture, praise, and endless worship
Will be our sweet portion there.
Reminder: To turn off the blog music, scroll to the bottom of the page. Enjoy -- I love this version -- reminds me of all the bluegrass music my Dad listened to when I was a kid.
Friday, August 5, 2011
Shopping The Farmer's Market
Here we are at the weekend again. I'll be headed to Farmer's Market -- on my list tomatoes, cucumbers, new potatoes and cantaloupes. Of course, I'll scope out what else looks good. Passing along this list which applies to both Farmer's Market AND the country cousin of the FM -- The Farm Stand. Both are wonderful places to shop for local, seasonal goodies!
1. Plan to spend some time -- slow time -- at the market. Start by walking around to see what's there before you start to shop, especially if you're new to the market. It's fine to buy randomly, choosing what looks good and appeals to you, but if you take a few minutes to stroll around, you may also find some menus and recipe ideas forming in your head.
2. If you do not recognize what it is you're looking at, or you need a tip on how to use it, ask the growers. They don't always know, but often they do, or they have recipes available. And if you ask in a loud enough voice, invariably a nearby customer or two will chime in with a few ideas. And don't forget to consult your cookbook collection.
3. Bring cash. Some farmers will accept a check, especially after they've seen you shopping at the market for a while, but many don't. If possible, try to show up with small bills.
4. If it is important to you that your food be organic, ask if it is or how it's been raised. It may be unsprayed (pesticide free) or on its way to becoming organic (transitional) or organic. Those who have been certified will most likely have their certificate on display. However, not all organic farmers choose to become certified, a process that can be prohibitively expensive and enormously time consuming. They may prefer to rest their claims as to how they farm on trust and the openness they enjoy with their customers.
5. If someone offers you a taste of something, take it! It doesn't commit you to buy. Farmers want you to taste their food. you might discover something new that you like, or you might find that what a farmer sells is not the same as what you find in the store. A taste could change your mind about a fruit or vegetable.
6. Take a feast-now approach when shopping. Unlike at the supermarket, the appearance of a particular fruit of vegetable os often short, and when something is gone, it's gone. When you find something you really like, ask how long it will be available. A favorite might only be around for a short while, so buy accordingly and enjoy.
7. If you think it will be a while before you get home from the market, bring a cooler. It will help you keep your food fresh while your stay on to visit or do other errands.
8. Bring your own bags -- I use a few canvas and oil cloth bags for toting my weekly haul.
9. Take your kids along and let them buy a few things from a farmer, too.
10. If you have a chance to take a farm tour, do! It always deepens our appreciation for and understanding of where our food really comes from to walk down the same rows the farmer does, it is also a great way to get to know your local farmers.
Thursday, August 4, 2011
Old-Fashioned Bake Sale ~ Fruity Granola Bars
I have a confession to make -- I didn't bake a thing all week. I intended to -- in fact, I set aside this afternoon to make this wonderful, many times tried and very true recipe. Didn't happen. I got a better offer and off I went thinking I'd make them when I got home....didn't happen again. I am going to go ahead and pass along the recipe but I have no photos to share. Sorry. What I can tell you about these is they are perfect lunchbox treats. I promise to really bake next Friday's featured recipe. Thanks for your understanding :)
Fruity Granola Bars
(Printable Version)
1 cup low-fat granola
1/2 cup quick oats
1/2 cup whole wheat flour
1/2 cup dried mixed berry blend
1/4 c up sweetened flake coconut
1 egg
1/3 cup canola oil
1/3 cup agave nectar
Preheat oven to 350°F. Line an 8-inch square baking pan with foil, allowing foil to go over edges of pan. Lightly coat foil with non-stick spray. In a large bowl, combine granola, oats, flour, dried fruit and coconut. Set aside. In a small bowl, combine egg, oil and agave nectar; stir into granola mixture. Press mixture in prepared pan. Bake for 20 to 25 minutes or until lightly browned around the edges. Cool in pan on a wire rack for 2 hours. Grasp ends of foil and lift from pan. Cut into 12 bars. Wrap each bar in plastic wrap. Store wrapped bars at room temperature for up to 3 days, or freeze the wrapped bars in an airtight freezer container for up to 3 months. Makes 12 servings.
Monday, August 1, 2011
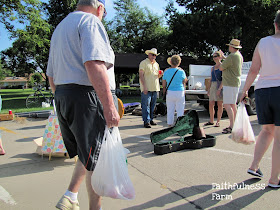
Saturday Morning at Farmer's Market
Summer Saturday mornings are pretty predictable for me. Up early -- lots of watering, mowing and tending to the yard and gardens. Then errands.....banking, materials to be returned to the public library and then my last stop -- THE FARMER'S MARKET!!
I love supporting our local farmers and getting the oppportunity to buy produce that is local and as fresh as can be.
There is also fun non-food items to look at and purchase.
Old friends to visit with and catch up.
In every community I've lived in, whether in the country, small town or big city, the Farmer's Market has aways been a big deal for me.
August marks the begining of peak Farmer's Market season. All month I will be posting some great tidbits about Farmer's Markets and end the month with a trip to one of my favorites -- Lincoln, Nebraska's HayMarket. I look forward to YOU telling me about your Farmer's Market!