


Showing posts with label Farmhouse Tutorials. Show all posts
Showing posts with label Farmhouse Tutorials. Show all posts
Hemming & Hawing
Monday, August 27, 2012
Hemming and hawing means to speak hesitantly or inarticulately, with numerous pauses and interjections. Although I rarely hem and haw -- I most certainly HEM!

A DIY Weekend :)
Monday, June 18, 2012
 |
| Photo Creidt: Curbly |
Although I did get to a few projects, we are still *in process* on most so basically I am going to *tell* you about them and then will share some photos -- BIG-reveal-style -- SOON.

Once the porch paint is dried and cured a bit, I can put my vintage wicker furniture back out. Do you
 |
| Faithfulness Farm: Nebraska Junk Jaunt |
Now that my yard has so many more sunny spots sans the trees, I've been looking for gardening inspiration like CRAZY! I ran across this image on Pinterest.....
 |
| Samplers and Santas |
ALL those projects and I also rearranged the living room -- I'll share WHY I did that later this week.
Isn't it great to have company come (my Mom & Dad from Arizona and #1 Son from Minnesota) to light a fire under the hiney and get some of the STUFF crossed off the list!
Wishing a WONDERFUL week -- I'll be putting finishing touches on THINGS -- can't wait to show YOU! What is on YOUR DIY list?
Adding this post to Yvonne of StoneGable's new Linky party -- TUTORIALS TIPS AND TIDBITS - oh, what FUN!!
Baby, Baby, Baby ~ My Favorite Baby Gift to Make & Take!
Saturday, December 10, 2011

Fair warning here. We are getting close to the time when our new little family member will be making his appearance -- I've done really well at sitting on my hands BUT you might want to know that baby posts are a coming :)
Have you ever noticed that babies kind of arrive in clusters? Some sweet friends from church just had baby girl #3 a couple weeks ago. Daughter was 1 of 3 pregnant at work - one baby born recently and another to be born about 6 weeks after daughter's. One of daughter's besties is having a baby due the week before her (a baby girl named Lydia -- our baby boy's first girlfriend, lol) and a niece is also expecting in the same time frame (another baby boy). Nothing like having babies around.
I tend to make and take the same gift to every shower or every first visit to a new baby. I recently finished the one I am sending to niece's baby and I thought I'd share it with you.
I use 2 1-1/4 yard lengths of flannel. Matching is fine but not matching is better. Right-sides together, stitch the 2 pieces together, leaving an opening of about 6-inches for turning. Trim corners to 1/4-inch of stitching. Turn right-sides out and top-stitch around perimeter of blanket, closing the opening you previously left for turning. Now you are ready to crochet your edging on.
Forevah I have used the same pattern book for my edgings BUT you can find tons of patterns available on the internet. I used #29 for this particular blanket.
I am very happy with the end result of this one. This baby will live in a very cold part of the country so that double thickness will be super warm. If for a summer baby, I have also used just a single-thickness and simply hemmed the raw edges before attaching my thread and crocheting.
Now that is complete and ready to tuck into the mail this next week, I have another one to start....
sshhhh...don't tell - this one is for grandbaby!
Posting to Susan's Metamorphosis Monday at BNOTP!
From The Hymnal ~ In The Garden
Sunday, March 20, 2011
 Last night I was chatting with a very special friend - I was telling this friend about all my favorite flowers - violets (that represent faithfulness), roses, lilacs, and my list goes on and on. After that conversation, I found myself humming this hymn.....I love this hymn. It has always been one of my favorites but just like flowers, I don't have just one favorite! Happy first day of spring!!
In The Garden
I come to the garden alone
While the dew is still on the roses
And the voice I hear falling on my ear
The Son of God discloses.
Refrain
And He walks with me, and He talks with me,
And He tells me I am His own;
And the joy we share as we tarry there,
None other has ever known.
He speaks, and the sound of His voice,
Is so sweet the birds hush their singing,
And the melody that He gave to me
Within my heart is ringing.
Refrain
I’d stay in the garden with Him
Though the night around me be falling,
But He bids me go; through the voice of woe
His voice to me is calling.
Refrain
You can turn off the blog music at the bottom of the page.
More Doilies
Sunday, January 30, 2011
When I was writing my recent post on crocheted doilies and edgings I found some wonderful ideas for repurposing doilies. Some I had seen before like framing them. I LOVE this idea and am watching out for the *right* frame to try this project. I recently spoke with one of my oldest and dearest friends and she told me about having a tablecloth her grandmother crocheted framed. It measures 6-feet x 6-feet. Can you imagine? I cannot wait for her to send me a picture of that.
I also saw sachets made from doilies...very cute. The project that got my rapt attention though was using doilies to create a tablerunner. The examples I saw were stunning (you can see them here and here)....I TOLD you they were stunning! I just had to have a doily runner. Problem with that was that I didn't have enough doilies in the color I was going for to construct one. That meant no matter how much I was trying to avoid the thrifty stores, I had to go thrifty shopping!

I found a few that were going to be perfect for this project but I was concerned that I had too many differing shades of cream/beige/ecru and even a couple dirty looking white ones. My solution....tea staining. Now they are close to the same color. After tea staining and starching, the doilies were ready to assemble into a runner.
First you take the largest doilies and arrange them on the table. Fill in with smaller doilies, overlapping. Once you are sure of your placement, tack down at overlapping points by hand. The best part is if you ever decide you'd rather have individual doilies again, just snip the tacking stitching and you are set. Now to create a tablescape with this beauty!


Sharing at Mary's Masterpiece Monday, Susan's Metamorphosis Monday, Krafty Kat's Gettin Krafty With It, and Stephanie's Sunday Showcase Party.
Cupcake Bouquet
Sunday, January 23, 2011

Thank-you Stephanie for featuring Faithfulness Farm and my fun cupcake bouquet!
I am always on the lookout for fun ways to present food. I recently saw a cupcake bouquet. To quote Ina, HOW EASY IS THAT!! Pretty easy and what a GREAT project for Valentine's Day, Mother's Day, a shower, a tea party or any occasion you want something special. You need cupcakes and frosting (tint if you want to color your cupcakes). The other things you'll need is an urn or pot, a 1/2 round of styrofoam to fit into your pot, toothpicks and a pastry bag for piping your frosting.

I used mini-cupcakes from my favorite devil's food cake recipe. See below for recipe.

My favorite vanilla buttercream frosting tinted PINK.

TADA!! Isn't it pretty?!


Devil's Food Cake
(Printable Recipe)
1-1/4 cups sugar
1 cup buttermilk
2/3 cup vegetable oil
2 eggs
1 teaspoon vanilla
1-1/2 cups all purpose flour
1/2 cup unsweetened cocoa powder
1-1/4 teaspoons baking soda
Preheat oven to 350°F. Grease and flour two 8-inch-diameter cake pans with 1-1/2-inch-high sides. Whisk first 5 ingredients in large bowl to blend. Sift in flour, cocoa and baking soda. Stir to combine. Divide batter between prepared pans. Bake until toothpick inserted into centers comes out clean, about 25 minutes. Cool in pans on racks 10 minutes. Turn cakes out onto racks and cool completely. (Can be prepared 1 day ahead. Wrap cakes separately in plastic wrap and store at room temperature.)
Vanilla Buttercream Frosting
(Printable Version)
2 sticks butter, softened
1/4 cup half & half
5-1/2 cup confectioners' sugar
1 teaspoon vanilla
Place softened butter in bowl and add confectioner’s sugar. Mix well, and then add the milk and vanilla. Mix until smooth. Makes enough to frost a two layer cake or 30 cupcakes.
Sharing at Miss Betty's Cupcake Sunday, Mary's Masterpiece Monday, Susan's Metamorphosis Monday, Krafty Kat's Gettin Krafty With It, Beverly's Pink Saturday and Sunday Showcase Party.
.
Old Lace
Saturday, January 15, 2011
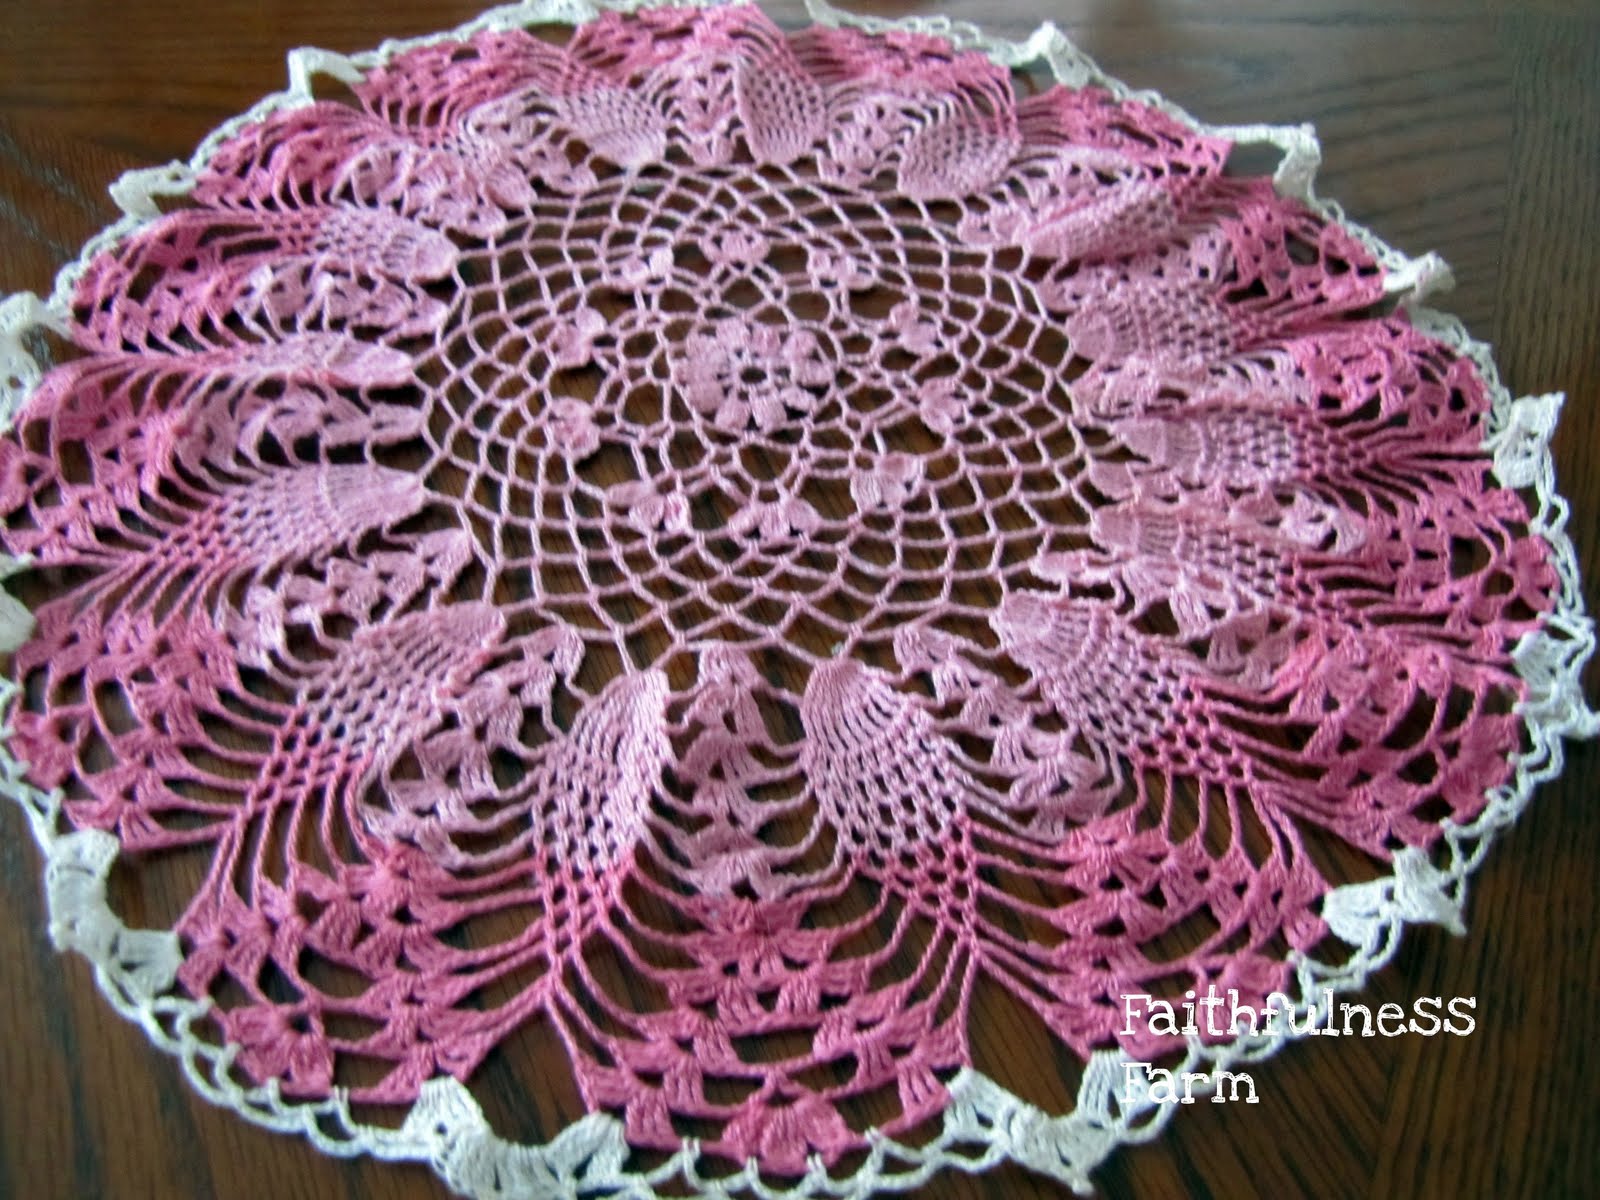
Unashamedly, I love old lace. I am especially drawn to old crocheted edgings and doilies. Maybe because I crochet edgings and doilies and know the work involved in making them. I simply cannot leave them behind when I find them. Recently when I was digging thru my seasonal goodies looking for Valentine’s themed things I found a pink doily that I had stored away last summer. It is a garage sale find. I think I paid .50¢ for it. I rarely am asked more than that for these beauties.

Since I needed to wash and starch this it before it could go on my table I thought I’d share a couple thoughts on the care of old lace.
Old lace must be handled with the greatest of care because it is fragile in nature. Age weakens the threads so even the gentlest agitating while washing can cause a break and I don’t even want to think of the damage that can be done by harsh detergents and bleach. No machine washing. The way I clean them is to use warm, soapy (homemade laundry soap but Dawn dishwashing liquid is also very good for this purpose) water in a wide-mouth canning jar.

Tuck the lace inside the jar and simply turn it around and shake it. Rinse using the same method and clear water.

Do not wring or squeeze the wet lace as you can really stress the threads.

Instead lay flat on a towel and roll it up. Gently squeeze the roll. Unroll and allow to dry flat. When almost dry press with a warm iron remembering to put a piece of muslin between the iron and the lace.

Some crocheted pieces really need starching or stiffening so the items will hold shape. There are many recipes for “stiffeners” including some using glue, sugar, flour and shellac. Avoid those. I use old-fashioned laundry starch. Although I have heard of people using spray starch, I don’t see how you can get the same penetration of starch in the threads. You can buy laundry starch in both powdered or liquid form although I have to say that the powdered starch is getting harder to find. Too bad because it really is the best product. Some day I need to do a post on all the wonderful products you used to be able to buy and now cannot. I starch between hard and medium, which gives the doily nice body but doesn't feel like it is too rigid. Using liquid starch, that is a solution of 1/3 starch and 2/3 water. Use the same method as above for wringing out and drying but use rust-proof pins to block your doily into shape.


Stop by again this next week to see what my plan is for these beauties!

Sharing at Beverly's Pink Saturday, Laurie's Favorite Things , Marty's Tabletop Tuesday and Lady Katherine's Tea Time Tuesday. Please visit these inspiring ladies and their lovely blogs.
Cupcakes~Wrap 'em up!
Saturday, November 27, 2010
Isn't it fun just how popular cupcakes have become! I enjoy making cupcakes (goes back to my LOVE of the individual serving). As a part-time caterer, I would much rather get orders for cupcakes...much easier than decorating a whole cake in my opinion. One of the FUN things I love doing for my cupcakes is adding a WRAP. There are lots of places you can order or buy these, but I save that expense and make my own. A very easy-peasy project. I found a template here. I use a decorative scrapbook paper and make my cupcakes look festive and fun for whatever event I am making them for.
 From the recent Vintage-Themed Baby Shower I hosted.
Recently I was contacted by my friends at Gooseberry Patch. They plan to use my favorite Double-Maple Cupcakes in their SOON to be released book, 101 Cupcake, Cookie & Brownie Recipes (stay-tuned for a review and giveaway of this book). These are very special cupcakes for sure!

Double-Maple Cupcakes
(Printable Version)
Cupcakes:
½ cup granulated sugar
5 Tbs butter, softened
1 tsp vanilla extract
½ tsp imitation maple flavoring
2 large eggs
1¼ cups all-purpose flour
1¼ tsp baking powder
¼ tsp salt
¼ cup lowfat milk
¼ cup maple syrup
Frosting:
3 Tbs maple syrup
2 Tbs butter, softened
½ tsp vanilla extract
½ tsp imitation maple flavoring
1/8 tsp salt
1¾ cups powdered sugar
Toasted pecan pieces, optional
Preheat oven to 350°F. Line a 12-cup muffin pan with paper liners. To prepare cupcakes, beat first 4 ingredients at medium speed of a mixer until well-blended (about 5 minutes). Add eggs, one at a time, beating well after each addition. Lightly spoon flour into dry measuring cups; level with a knife. Combine flour, baking powder, and ¼ tsp. salt in a bowl, stirring well with a whisk. Combine milk and ¼ cup maple syrup. Add flour mixture to sugar mixture alternately with milk mixture, beginning and ending with flour mixture; mix after each addition. Spoon batter into prepared muffin cups. Bake 20 minutes or until a wooden pick inserted in center comes out clean. Cool in pan 10 minutes on a wire rack; remove from pan. Cool completely on wire rack. Prepare frosting: Beat 3 Tbsp. Maple syrup and next 4 ingredients (syrup through 1/8 tsp. salt) at medium speed of a mixer 1 minute. Gradually add the powdered sugar, beating just until blended (do not overbeat). Spread the frosting over cupcakes. dip in toasted pecans. Makes 12 cupcakes.
Joining at at~
Betty's 2nd Cupcake Sunday
Lisa's Tempt Your Tummy Tuesday
*Vintage* Tissue Paper Flowers
Wednesday, November 10, 2010
Have you ever made flowers from tissue or crepe paper? We did this all the time when I was a girl. I think of them as vintage or old-fashioned. I am co-hosting a double baby shower this weekend. My co-host is in charge of the games (blah, I hate doing the games, lol) and I am in charge of the food and decorations. We (read that *I*) set the theme VINTAGE Baby. We have a girl baby (Eliana Elise) and a boy baby (Silas James) so we're going to have lots of pastels...blue, pink, green, yellow and lavender. I've collected a lot of the vintage Napco baby planters and needed something to put in them. Our budget is limited and I'd rather spend it on food and such, not live plants or flowers. If it was summer, I'd be raiding peoples gardens but alas, the flowers are done for the year.

After some thought, I settled on making pastel colored paper flowers. I've told a few people of this plan and they look at me like I've sprouted another head. Never heard of paper flowers? Well, they are easy, fun and best of all very budget friendly. I got a multi-pack of pastel tissue paper at Dollar Tree. That is enough for 60 flowers. The only other supplies needed are floral wire, floral tape, scissors and a wire cutter (unless you buy precut wire).


I am sharing a video tutorial for making paper flowers and will be sharing lots more from the shower in the next week including recipes and tablescapes. My flowers differ only in that I use a wire instead of string and then floral tape the wire to form a stem.
Sharing at:
Suzanne's Vintage Thingie Thursday
Debra's Vintage Inspired Friday
Laurie's Favorite Things
Mt. Washmore & Homemade Laundry Soap
Friday, October 1, 2010
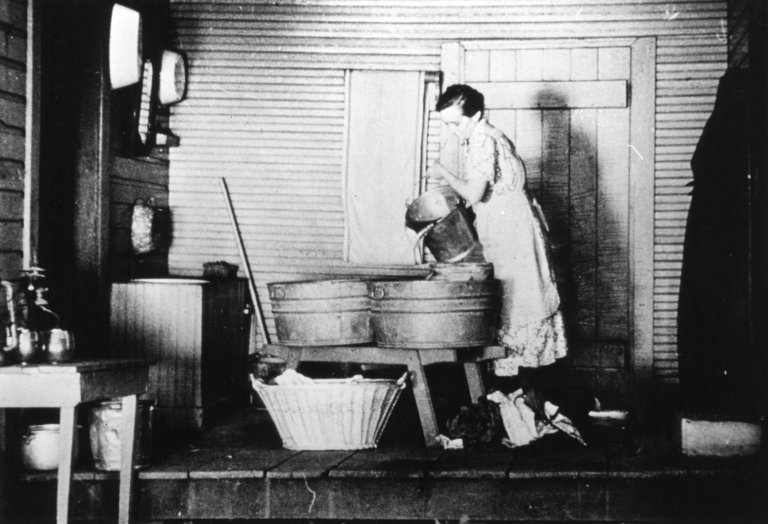
Laundry (yes, at my house it is called Mt. Washmore)! NOT my favorite chore. It has gotten easier over the years. No more cloth diapering, 2 kids on their own, teens who help with their own laundry. Still, I don't enjoy it. I do enjoy hanging out a wash, listening to the hens scratch and feeling a nice warm breeze thru the clean laundry BUT that is rarely my experience these days. I must confess I always feel a tad guilty complaining about laundry. Afterall, my own mother used a wringer style washing machine (no automatic dryer) until I was in Jr. High School and forget about what my foremothers did before her. No right to complain....but alas, I do! Give me a toilet (or a hundred) to scrub any day before the laundry.

I've tried many *systems* over the years to make the chore, well, less of a chore. I was thrilled when I saw that the author of my favorite homekeeping book (Cheryl Mendelson, Home Comforts) had written a book targeting this most dreaded of household tasks. I was eager to give it a look over. I knew I was in trouble when I read, "For Cheryl Mendelson laundering is the best part of housekeeping". Not my take on things and truthfully as much as I love Home Comforts, I found this newer book to be just redundant information already contained in the first book. If your library catalogs this book, please check it out and decide for yourself if you need to add it to your personal library. For me, the first book was all I needed to own.

All that out of the way, one thing that is a favorite when it comes to laundry is my homemade Laundry Soap. Years ago, I used the liquid (gel) version but switched to the dry version to make it more time efficient for me. My orginial reasons for using a homemade version were purely thrify ones. Now I realize, I am a better steward when I use this. Less money, less packaging and really a better product in my opinion. This recipe calls for Fels Naptha laundry soap. To me it is the key to this being a superior product. I use a bar of Fels Naptha as a stain remover (just moisten the bar and rub into the stain and wash as normal). It really is great stuff. Please do not substitute Ivory, Castile, Zote or even homemade soap. Your results will not be the same. When I have a load of especially soiled laundry, I fill the tub with water and allow the laundry to soak overnight.
Homemade Laundry Detergent Recipe
(Printable Version)
2 bars Fels-Naptha laundry soap
4 cups Arm and Hammer washing soda
4 cups Borax
2 cups Oxyclean
In a large bowl mix together the washing soda, Borax, and the Oxyclean. Grate the Fels-Naptha (a food processor makes this part much easier). Combine the grated soap into the dry mixture and combine thoroughly. Place in container with a lid for storage.
You can add between 5 to 10 drops of essential oil to your homemade laundry detergent if you prefer your laundry soap scented (essential oil ideas: lavender, rosemary, tea tree oil). I really enjoy the clean smell of the fels naptha.
To use:
Use 1 heaping 2-Tbsp scoop (a 2 Tbsp coffee scoop is perfect for this) per laundry load. Place in washer as water is filling and then add dirty laundry.
Skip commercial fabric softeners and use 1/2-1 cup distilled white vinegar in the rinse cycle.

Sharing at Laurie's ~ A Few of My Favorite Things
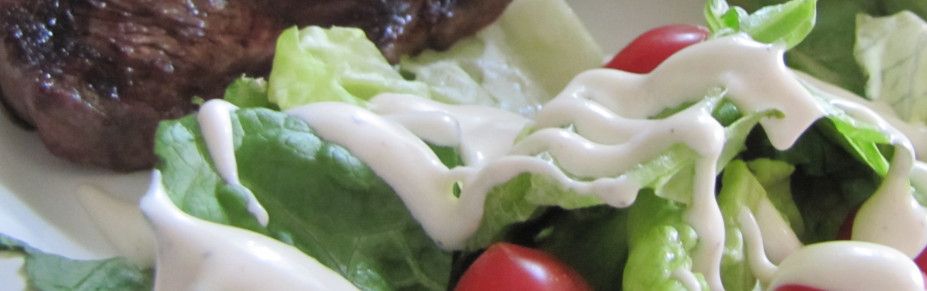
Cast Iron Cooking-How to Cook A Steak
Thursday, September 2, 2010

We live in Nebraska which is known for 2 things....corn and beef. We enjoy nothing more than a good steak and although summer is grilling season, our preferred method for cooking a steak is the trusty cast iron skillet. This is an ages old method and gives you a wonderfully juicy steak every time, regardless of the weather.

Start with a well-seasoned cast iron skillet in the 8- to 12-inch range. You want to use a flat-bottom, not a grill bottom skillet.
Before we begin, a word on safety: you are going to be working with VERY hot metal. Use a double or triple thickness of potholders. Do NOT use a standard oven mitt, as when the pan heat penetrates, your hand will be trapped in there with it.
This technique will also generate a fair amount of smoke, so turn on your vent fan and crack a window to allow good airflow. Don't worry, though, the only smell that will linger will be that of delicious steak.
First, set your steak out and allow it to come to room temperature. Don't worry about it spoiling, you won't be leaving it at room temp long enough to do any damage.
Now, put your seasoned skillet in the oven and set the temperature to "broil." Allow it to heat for 15 to 20 minutes. While the oven is heating, season the steak on both sides with liberal pinches of salt and freshly ground black pepper. Add a light coating of oil (not olive oil for this job since it's smoking point is too low). Once your oven heating is done, turn your large stove burner to high. If it's an electric stove, allow the burner to come to full temp. Remove the skillet from the oven and set it on the burner for another three minutes. You will now have an insanely hot cooking surface.

Using tongs, place the steak in the skillet. After 30 seconds, turn it over to brown the other side. Transfer the skillet to the center rack of your oven and cook for three minutes on each side. (NOTE: This cooking time is for an inch-thick steak. Adjust your time for thinner cuts.)
Remove the skillet from the oven, and move the steak to a platter to stand. This is perhaps the most neglected portion of any meat cooking process. If you cut into a steak, pork chop or even chicken before it's had standing time, you will end up with a platter dripping with juices that belong in the meat. Allow your steak to stand, with a tent of foil to retain the heat, for 10 minutes and you'll be rewarded with a steak that is as juicy on the last bite as it was on the first, and leftovers that won't have the texture of cardboard.

During the resting period, I crumble my favorite, Magtag Blue Cheese (from our neighboring state of Iowa) over the steak and it melts into a delicious, cheesy topping. YUM!!
Sharing at Michael Lee's Foodie Friday at Designs by Gollum.
Subscribe to:
Posts (Atom)


