One Eerie Tale (or is that Tail?)

Sunday, October 30, 2011
By way of background for this story I have to tell you about my daily walking/running habits. I walk/run (trying to make it more run than walk - my goal is a marathon each week) here…

and here (only in inclement weather)

BUT my favorite place to walk/run is right in my own neighborhood ……

Now I realize that regularly walking/running at the cemetery may be a bit odd to some (or even most) but I love it.

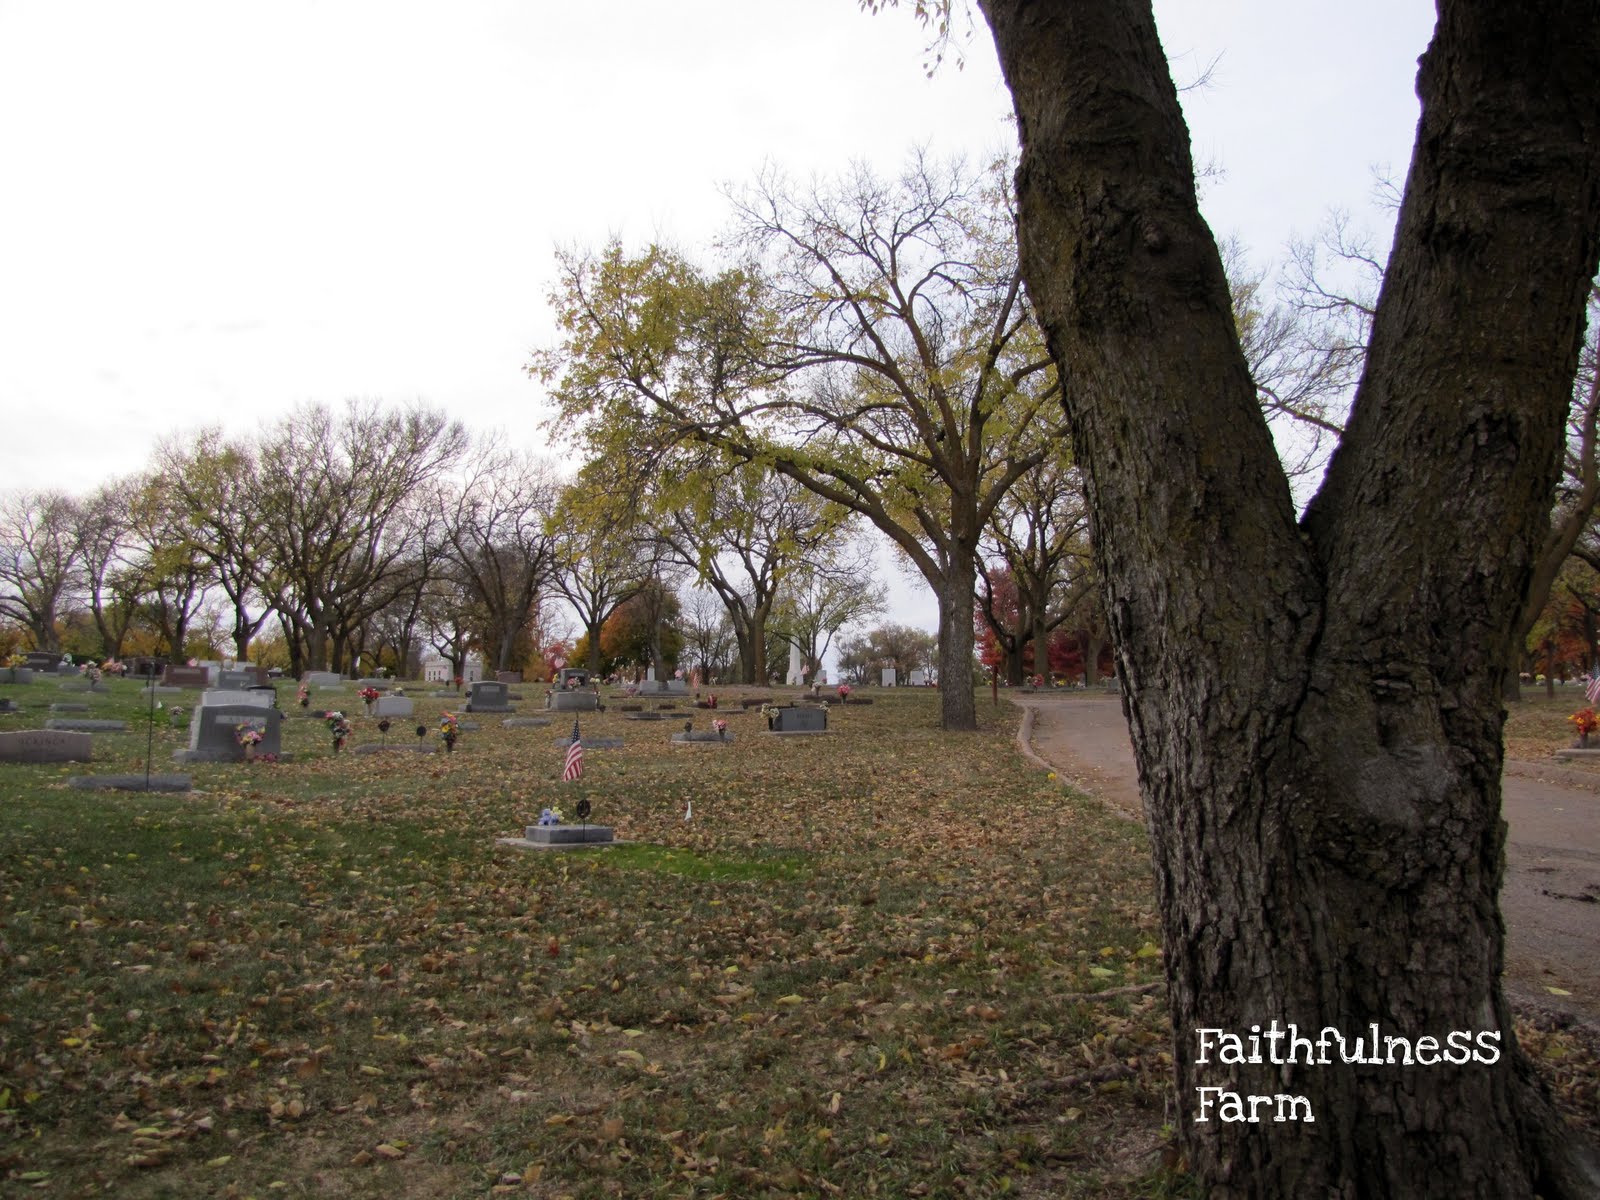
It is quiet and serene and I rarely run into another soul – I mean person there.

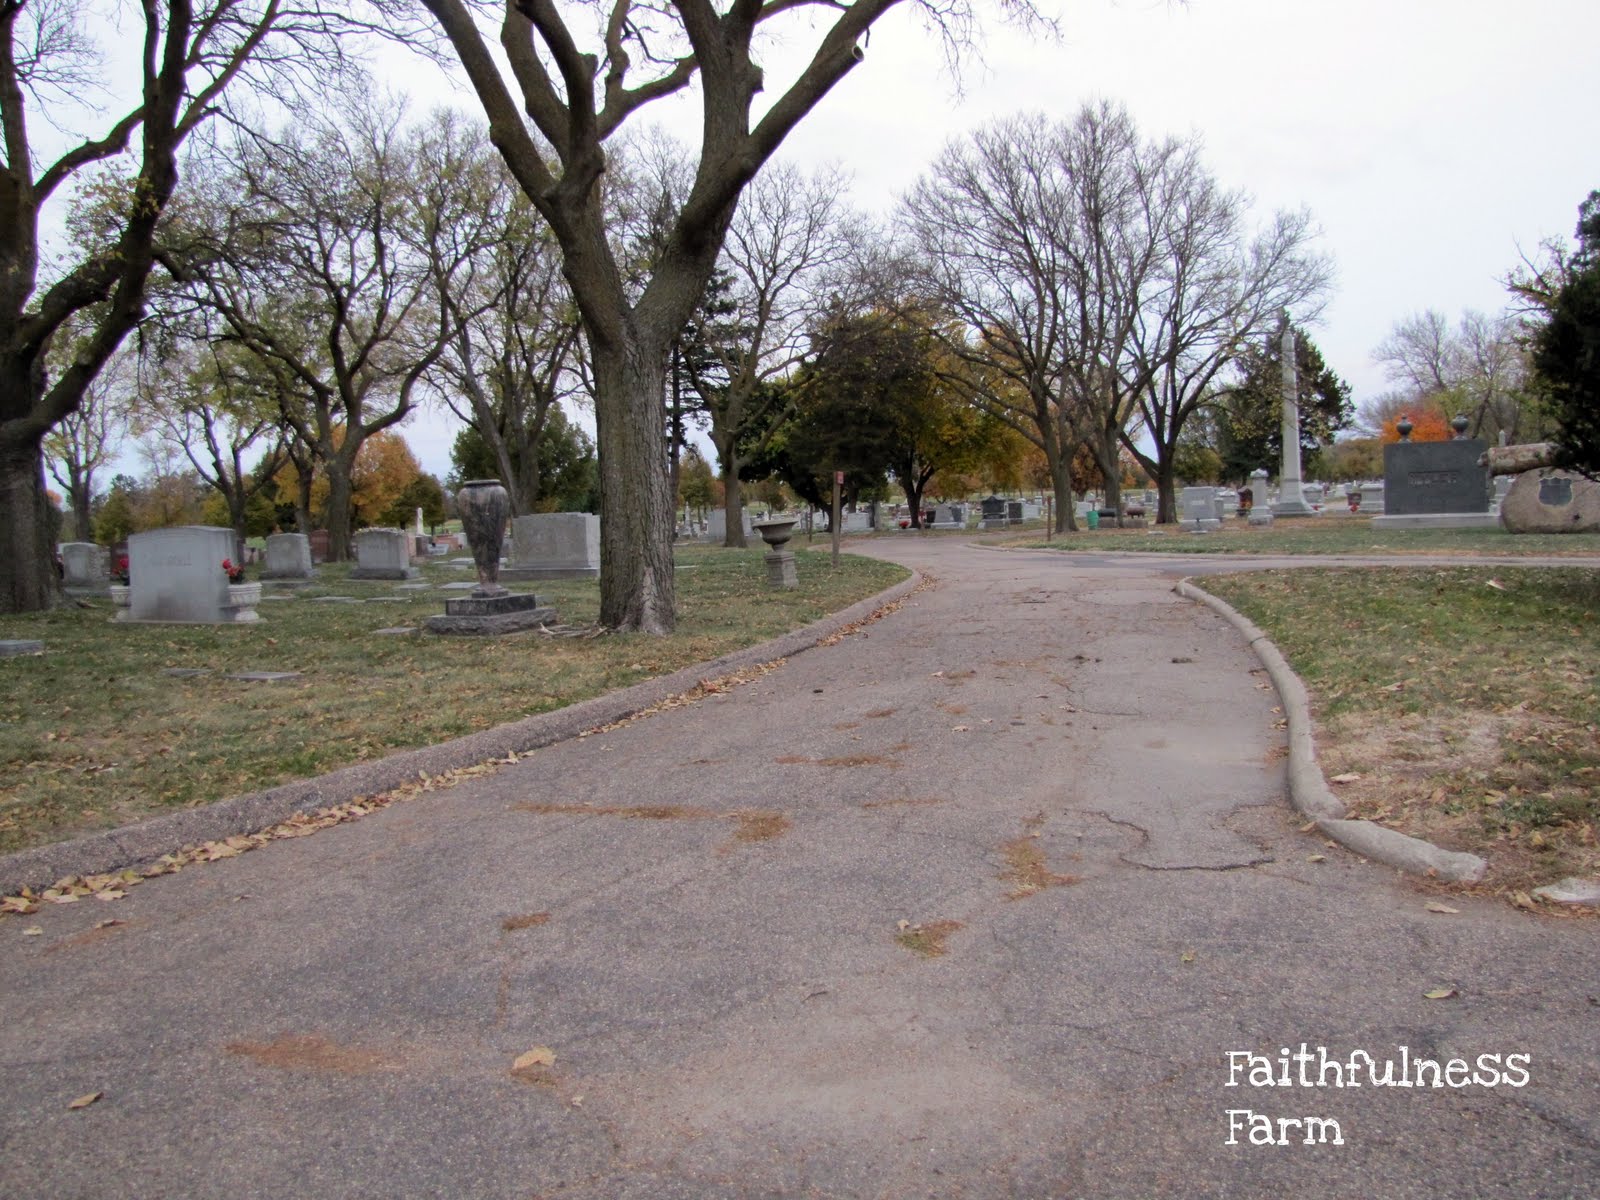
There are maintained paths to walk/run on and for the most part it is just like a country walk. I try to be very respectful of the fact that it is the final resting place for beloved ones.

Last Saturday I still needed to get in 2 miles to complete my marathon for the week so I could take Sunday off. I LOVE taking Sunday off! I planned to get in those miles early in the day but things kept coming up. When I finally took off for the cemetery, I was a bit later than usual, but I was determined to run that 2 miles. I knew I should probably just headed to the Y, but I am trying to get in all the outside time I can before the time changes and it is simply too cold or too dark for me outside in the evenings. So, I knew I was going to be pushing the limits……

I really wasn’t too worried about it though – I already have scoped out 2 different points that the fence has an opening in it that I easily can walk right thru if I ever was locked in and needed to. It does get a little dark after dusk, but I carry a small flashlight with me. I keep to the paths and besides, I had my trusted companion and walking partner, Josey with me.

The run was glorious – the trees spectacularly garbed in their fall attire. It was so peaceful and Jo and I were having a wonderful time.


I was emptying my mind and allowing my body to just enjoy the tempo of the run. We passed the halfway point and I was looking forward to making the final loop that would take me back towards the entrance and the sight of the beautiful sunset. I reached that loop -- the back stretch, which opens up to a large country field and I stopped dead in my tracks. There ahead, standing right in the path was a HUGE gang – maybe 20 of them. I wasn’t sure if they saw me yet and I wasn’t quite sure how I was going to proceed. I’ve seen their type before and I wasn’t sure how they would react to me and Josey coming upon them like this.

While I stood there paralyzed, it became obvious that they knew I was there. They started moving in my direction – slowly at first, the larger ones leading the way and then they picked up their pace and were quickly closing in on us. I had to make a quick decision, do I turn around and head back the way I came? Do I attempt to plow right thru them? Or do I do something I have never done before – leave the pathway and run thru the graves? The gate was closest if I took option 2 or 3 and honestly, plowing thru them wasn’t really an option.

Josey and I took off like a flash, dodging headstones and urns and trying to be careful of not actually stepping on graves, but I am sure we failed miserably in that – all the while, they were in hot pursuit.

When we finally dared to step back into the path and I looked behind, I could see them silhouetted in the small amount of light that was left. They were walking back towards where we encountered them. We had escaped – not without having the dickens scared right out of us but we were still in whole condition.

As we made it to the entrance, the city guy was there getting ready to lock the gate. I reported our altercation to him – he told me they had given chase to his truck a few nights before and seems they have decided that back stretch of path is their new turf. I just hate it when the hoodlums take over. I’ve learned my lesson though. There are scary things laying wait for you in the dark – especially in the cemetery. I won’t be doing that again any time soon.

Well, I actually dared to go back the very next evening, camera in hand, and found my pursuers congrated in the back field and very so quietly I took their pictures -- they did not see me this time, so there is no harrowing tale (tail) from the second night, lol!


A group of wild turkeys is called a rafter or gang!

Old-Fashioned Bake Sale ~ Oreo Cupcakes

Friday, October 28, 2011

Before I get to today's featured recipe, I have a little business to get out of the way. Firstly, I want to show off the wonderful blog giveaway I won. The sweet Linda from Lemon Drop...her blog is FABULOUS and you should be following....hosted this giveaway of all these great baking goodies! Thank you Linda :)

Next, I have to tell you about the Apron Swap that Miss Sue from Country Pleasures hosted. Miss Sue is the Apron Queen. My swap partner was Xo from Apron Crazy (click to check out the apron I made her). She sent me the CUTEST Halloween apron and I plan to be wearing this weekend when my little friends come for lunch! Thanks Xo!! Oh, and in case you'd like to apron swap -- Miss Sue is taking names for her Chritmas Swap! Scoot over there and get signed up and SWAP with us :)

I've been playing with the idea of making an Oreo Cupcake for some time now. I've looked at dozens of versions -- some are based on white cake and others chocolate -- some place a whole Oreo into the bottom, others pull them apart and just put in a portion of the cookie and others yet add crumbs to the batter. I decided I liked elements of several recipes so created a hybrid of my own. I took a practice version batch into work and got scolded by my boss who claims to be dieting, -- he ate one anyway, lol!


Oreo Cupcakes w/Oreo Cream Cheese Frosting
(Printable Version)

6 ounces bittersweet chocolate, chopped fine
2/3 cups Dutch-processed cocoa
1-1/2 cups hot, strong-brewed coffee
1-1/2 cups all-purpose flour
1-1/2 cups granulated sugar
1 tsp salt
1 tsp baking soda
3/4 cup melted butter
3 large eggs
4 tsp white vinegar
2 tsp vanilla extract

Preheat the oven to 350°F and line a muffin pan with cupcake liners. Place 1 whole Oreo cookie into the bottom of each lined cupcake line. Place chocolate and cocoa in a medium bowl and pour hot coffee over the mixture. Whisk until smooth and transfer to the refrigerator to cool completely, 20-30 minutes. Whisk flour, sugar, salt, and baking soda together in a medium bowl; set aside. Whisk melted butter, eggs, vanilla, and vinegar into the cooled chocolate mixture until smooth. Add flour mixture and whisk until batter is smooth. Divide batter evenly among muffin pan cups, filling each 3/4 full. Bake until cupcakes are set and firm to the touch, 17-19 minutes. Allow to cool in pans 10 minutes, before transferring to a wire rack to cool completely.


Oreo Cream Cheese Frosting

1 8oz pkg cream cheese, softened
1 cup butter, softened
2 tsp vanilla extract
Dash of salt
3-4 Tbsp cream (1/2 & 1/2, milk or evaporated milk will work fine)
6-8 cups confectioners’ sugar
1/2 cup crushed Oreo’s (I do a whole package at a time in my food processor and then freeze the crumbs to use in recipes).

Combine the cream cheese and butter in the bowl of an electric mixer. Beat on medium-high speed until well combined and smooth, about 2-3 minutes.
Mix in the vanilla extract and cream. Gradually beat in the confectioners' sugar until totally incorporated. Add crushed Oreo’s increase the speed and then beat until smooth. Generously frost cooled cupcakes as desired. Garnish each cupcake with 1/2 an Oreo cookie.

Makes 24 cupcakes.

Posting to Michael's Foodie Friday and Honey's Potpourri Party!

Debbie Mumm Trick or Treat Tablescape

Thursday, October 27, 2011
I love the artwork of Debbie Mumm and have
used many of her fabrics and quilt patterns over the years. A quilting friend who knows of both my Debbie Mumm and my dish *like* gifted me with these cute plates and mugs a few years ago. I thought them darling and her gesture so sweet -- problem with that was we usually just skipped Halloween.

This year my sweet little friends (the ones that were over a couple weeks ago) will be paying me a visit on Saturday and I decided to dust off those cute dishes and do a sweet lunch for them. They are coming dressed in their costumes (2 older boys are going to be firefighters and the younger one, a dalmation dog, lol). We'll lunch on soup and sandwiches and CUPCAKES (see tomorrow's Old-Fashioned Bake Sale post for the cupcakes).

The Welcoming Committee on the front porch!


Sharing at Susan's Tablescape Thursday!

One Good Thing!

Monday, October 24, 2011
I first saw this on Pintrest and thought -- no one's baking sheets look as bad as mine -- then I realized that maybe Jillie's from One Good Thing might come close, lol. I was very intrigued about her *Miracle Cleaner* and since it was my favorite kind -- made from household staples, I figured I'd give it a try and report back to you.

These babies are truly workhorses in my kitchen and have been for many, many years. I am not sure when these were purchased but I do remember having them when we still lived in California, so before 1999. Another thing I wanted to add is that I never saw anything wrong with my baking sheets looking like this. I've been behind the scenes in more than one commercial bakery and that is what the baking sheets look like -- I always thought of it as kind of a badge of honor -- my baking sheets get USED.

The results -- yep, this pan is certainly cleaner looking with all the carbonized stuff off of it -- but I am afraid the miracle cleaner had little to do with it - the cleaning machine was - good ole elbow grease and a stainless steel scrubber. I'm just going to let the rest of my stack of baking sheets keep their MUCH USED appearance.

I use baking soda to clean a lot of different things around the kitchen and did find the combination of the peroxide and baking soda did take some hard water spots off some serving utensils but I think I am not going to be using peroxide in the kitchen on a regular basis.

Note: I was asked why I wouldn't be using Peroxide in the kitchen regularly. The answer to that is it made me a bit uncomfortable. It has no smell or color and looks just like water. Not a safe chemical in the kitchen out of it's normal packaging. That is just my opinion, better to be safe than sorry.

Hooking up with Susan's Met Monday at Between Naps on the Porch.

*Blue* Sunday

Sunday, October 23, 2011
Not sure what it is -- feeling a little bluesy today! Maybe it is the cloud cover, or the fact that I am kind of sore from my run/walk yesterday or maybe my nest is feeling extra empty today or my Momma (and Daddy) are seeming extra far away in their new Arizona home -- not really sure, but I think my plan is to waller in it a little while. That is a rare move for me but my plan is to enjoy a melancholy afternoon. So what do you do when you plan to embrace the blues for a bit?

For me, it will look like this.......

(Jane's troubles are almost always worse than mine).

The projects I had planned can wait until later - tomorrow is a new day and I hear the sun will shine :)

Old-Fashioned Bake Sale ~ Candy Corn Cut-out Cookies

Thursday, October 20, 2011

Today's baking is for a very special purpose -- a benefit for Miss Aria. These goodies will be served to the helpers and donors. Please pray that they have a great turn-out as well as for Aria and her recovery. Thank-you!

I used some shortcuts and semi-homemade methods for making these little lovelies. I first saw this idea last year in Country Living magazine and was re-acquainted with it thru Pintrest. I thought with as many kids as will show up for the benefit, this would be a perfect time for making them.

Photo credit

Candy Corn Cookies
No one will guess these elegant cookies were made with refrigerated dough. Go ahead, let this simple shortcut remain your secret. To make this treat, knead extra flour and orange food coloring into refrigerated sugar-cookie dough (I used 2 regular sized rolls of cookie dough and 1/2 cup all-purpose flour - it was easiest to allow it to come to room temperature, put it in the mixer bowl with coloring and flour and mix - and then into the refrigerator to chill down before rolling out). Use a triangle-shaped cutter; bake and let cool. Dip the wide base of each cookie into melted dark chocolate, then dip the tips into melted white chocolate (I used almond bark for both ends). Set on a parchment-lined baking pan and chill in freezer for 5 minutes.


Important reminder, if you are wanting to color your almond bark or white chocolate, you must add the coloring prior to melting -- waiting until after can result in seizing -- I KNOW that for sure. After 2 unsuccessful attempts, I decided to use yellow sanding sugar instead of yellow food coloring :)

Posting to Michael's Foodie Friday and Honey's Potpourri Party!

Dishes, Dishes, Dishes!

Wednesday, October 19, 2011
Remember back at New Years when everyone in blogland was picking their word for the year? I didn't really find one that fit but I should have picked DETERMINED! I entered this year determined to NOT add to my lumbering collection of dishes. I've done pretty well. In January, I was off to a shaky start when I found these vintage Clover Blossom dishes to complete my everyday breakfast set.

But I gave some dishes to Goodwill in my January organizing blitz. That round of purging was pretty painless. It was mostly, the *WHAT WAS I THINKING* dishes.

Then along came March -- FOREVER I had been coveting some Mikasa white dishes and found (at Goodwill again) a complete set for 8 of French Countryside (with completer pieces) for a fraction of their worth, in pristine condition and they came home with me too.

I knew I'd use them and indeed I do. I replaced my old *everyday* dishes with them. AND I gave my old everyday dishes away to a friend. Although I liked my old white dishes, the parting was pretty painless.

Spring and summer found me pretty distracted and although I did do some thrifty shopping, I only breezed past the dishes. I completely stayed away from my old haunt, TJ Maxx....that is, until late summer. I went in there with daughter to *look at baby stuff*. I knew it would be hard for me and indeed it was. One stroll down the clearance aisle and away I came with ......

Now let me clarify, the green square Mikasa's were already mine (yeah, I lugged them babies all over Mall of America last year -- I think my right arm is now permanently longer than my left). What gave me such temptation was the square rooster plates -- BUT in all reality, I NEEDED square rooster plates to go with those (never been used) square green plates. I was TOTALLY justified in my purchase! When I got home, I searched my dish collection for something to go from my collection -- hum, I was pretty sure I could part ways with some funky dessert plates I had picked up somewhere in my travels. Off to the GW with them. Whew, I have not *added* to my problem, I mean collection!

Then I ran into a REAL problem -- A stack of 8 of these babies at GW.

Yeah, they are in my dish storage awaiting a holiday tablescape. NO MORE THOUGH -- NO MORE! Oh, and I didn't part with a thing -- my thought is I'll use them one season and then away they go! It isn't technically an addition if I'm not planning to keep them long term, is it?

A few weeks ago my daughters and I made our annual trip to Lincoln, NE to visit The Historic Haymarket (and this bad blogger totally went off without her camera -- it was sitting on the dining room table where I left it). This is a trip I look forward to every year. In the Haymarket is Burlington Antiques. My daughters ditched me there to run off and eat all sorts of foods that are forbidden for me to eat, lol. I was totally okay with that - you see, Burlington Antiques has more DISHES than your average antique mall. I knew I wouldn't be coming home with any of those dishes and enjoyed a long stroll through taking in ALL the wonderful antique and vintage dishes.

Even though I didn't buy a thing in that trip to the antique mall it STILL got me into trouble! You see, on Saturday, I was on the GW side of town and before I knew what was going on, I was pulling into the parking lot and heading right in the door. Let me say that this isn't my favorite time of year for thrifty shopping -- too many Halloween costume seekers are rummaging through my favorite thrifty source this time of year. That said, I made a pass around the whole store and then headed back to the dishes - spying a box on the ground, I take a peek inside and recognize what I see -- China -- made in England, bone china -- ROYAL WORCESTER CHINA -- TOPAZ BY ROYAL WORCESTER BONE CHINA. This was one of the chinas that I studied for quite some time during my trip to Burlington Antiques. I loved the fall like pattern, and the calming sandstone colored rim and the name -- my oldest daughters birthstone and now here I was holding a box full of it. The price ------ $3.00!! FOR ALL OF IT!! My GW has taken to putting sets of dishes in opened topped boxes and then using packing tape to make a see-thru but cannot handle thru top. You can see what is in the box but not really see anything under the first layer or so. Nothing was packed in paper so who knows what kind of condition these are actually in. Since the asking price was only $3.00, I took a chance on condition and exactly what was there. Once home, I inspected all the contents and basically pieced together 4 complete place settings (dinner plate, salad plate, bread & butter plate, dessert plate & cup & saucer). I am happy with that -- 4 diners is the most common at my dining table....anything more than that, and it will have to be a different set of dishes.
According to Wikipedia, Royal Worcester is believed to be the oldest remaining English pottery brand still in existence today.

Topaz was manufactured from 1958 through 1964.


These beauties will be making many appearances on my table over the next few weeks.


Linking to Susan's Tablescape Thursday!

Baked Eggs

Sunday, October 16, 2011
I always find it so easy to share ALL my confessions with you.....here goes my latest -- I am not that crazy about eggs. I eat them -- they are good for me and good for my low carb diet but truth be known, I'd much rather eat biscuits and gravy and mounds of crispy fried bacon (or better yet, about 1/2 a cherry pie and a pot of coffee, lol), but alas, I eat eggs. I will admit that home grown taste better than store-bought, BUT they are still eggs. About a year or so ago, I read about baked or shirred eggs (also have seen them called creamed eggs). Of all the ways there is to make eggs, this has become my favorite (if you can have a favorite of what you are not crazy about, lol). They are easy, make a great presentation and generally are a great way to enjoy eggs for breakfast.


This *recipe* certainly is a loose formula. You can always substitute spinach with other ingredients like bacon, ham, tomatoes or mushrooms and add whatever cheese you have or like or skip all the add-ins and just bake the eggs plain -- also pretty tasty. Those who eat bread say that toast is extra yummy on the side :)


Baked Eggs w/Spinach & Feta
(Printable Version)

2 Ramekins or baking dishes to hold two eggs
Olive oil to grease ramekins
4 large eggs
1 cup loosely-packed chopped spinach
2 Tbsp cream
1/2 cup feta cheese
2 green onions ends trimmed, thinly sliced
Salt & freshly ground black pepper

Preheat oven to 350°F. Brush the ramekins or baking dishes with a little oil to lightly grease. Line the dishes with chopped spinach. Crack one egg at a time over the spinach. Repeat with remaining ramekin. Pour the cream evenly among dishes. Sprinkle eggs with feta and green onions. Season with salt and pepper. Place dishes on a baking tray. Bake in preheated oven for 10 minutes or until eggs are cooked to your liking. Serve immediately with toast.

Posting to Yvonne's On The Menu Monday!