Blue Ribbon Recipes ~ Strawberry Relish
Posted by
Unknown
at
10:21 AM
Monday, June 28, 2010
Have you ever entered something into the county fair? I have! Growing up, we were 4-H kids and my kids were also 4-H kids (and have competed at State Fair level). Entering the fair is what 4-H kids do. As an adult, I still enjoy entering things into the open class competition and am thrilled to win a BLUE RIBBON! I've entered things like crocheted doilies, quilts, baked goods, jam & jellies, pickled items and garden grown goodies. County fair time is quickly approaching in Nebraska and I am scrambling to figure out what I am going to enter this year. We are very excited that our state fair has moved to a neighboring county starting this year. I thought it would be fun to have an ongoing segment for the summer on blue ribbon winning recipes. Maybe you'll find inspiration to enter something in your local fair.
Strawberry Relish
2 quarts strawberries (ripe but not overly ripe)
1 tsp allspice
1 tsp cinnamon
1 tsp cloves
7-1/2 cups sugar
2 Tbsp vinegar
1 packet liquid pectin
Combine all ingredients except pectin. Boil for 3 minutes. Stir constantly; remove from heat. Add pectin; stir and skim for 5 minutes. Pour into hot sterilized jars; seal*. Yield: 9-1/2 pints.
This recipe is from Blue Ribbon Recipes and was originally entered into the Rochester Fair by Ruth Henderson of Farmingham, NH (it is very close to the recipe below that is from an old canning booklet).
* This is an old recipe and standards now require that jams, jellies, fruit relishes, etc., be water bath processed. Here is complete directions on how to do that ~ Water bath canning.
Joining in at Lisa's Tempt My Tummy Tuesday!
Strawberries in a Strawberry Pot
Posted by
Unknown
at
6:27 PM
Sunday, June 27, 2010
Have you ever wanted to know how to grow strawberries in strawberry pots? It is actually very easy and a lot of fun....a great project to do with kids. There are many reasons why you may want to plant a strawberry pot. One of the obvious reasons is if you live in a condo or an apartment and you have no garden area. You can place these beautiful pots right on your deck and enjoy the freshly picked strawberries as they become ripe. That said, even people who have gardens, like myself, often choose to grow strawberries in strawberry pots. For me, I like the look of a lush strawberry pot but for others, using a pot makes controlling the runners easier than in a bed.
Getting Started:
First you need to make a trip to your local nursery or gardening center. You should be able to find all you need to get started there.
Your local nursery will carry more than a few varieties of strawberries that grow well in your area or for convenience you can order them online.You will have a choice between June bearing, everbearing or day neutral. An everbearing variety will produce strawberries throughout the summer, usually two or three crops. Day neutral varieties also produce strawberries throughout the growing season. June bearing varieties produce one large crop in late spring/early summer depending on where you live and then they will be done producing until the next year. June bearing plants are known to produce larger berries.
What You’ll Need:
Strawberry pot
Potting soil
Strawberry plants
PVC Pipe with holes drilled into it or a heavy-duty cardboard tube (left over from your gift wrapping paper or from foil or plastic wrap)
Pea or Small gravel
What To Do:
Place potting soil into the pot up to the lowest holes on the sides of the pot.
Remove a strawberry plant from its plastic container.
Break up the soil around the roots of the plant and fan them out a little. Place the plant into the pocket, add some more potting soil and pack it firmly around the roots. Plant the strawberry plant so that the crown is just barely above the soil surface. Plant strawberry plants in all of the lower pockets. Dig a small hole in the center of the dirt. Place PVC pipe or cardboard tube so that it is standing straight up the middle of the pot. Pack some dirt around it but you will probably have to hold it with one hand or have someone hold it for you until you get enough dirt around it for it to stand up by itself. Fill the pipe or tube with gravel. Add more potting soil up to the next pockets and plant strawberries in the same way as above. Keep repeating until you have filled the pot up with soil. Plant three or four strawberry plants in the top of the pot. If you used a cardboard tube, gently remove the tube leaving the gravel in place. If you used PVC pipe, just leave it in there. After planting, gently water the top of the pot and each opening. For the rest of the season you should be able to water just from the top as the gravel will help to spread the water throughout the dirt and take it down deep enough to the bottom plants. Keep an eye out though. If it looks like the plants in the holes are not getting enough water then you will have to gently water them through each opening. Placing some sphagnum moss around each plant will help to hold the dirt in if it is being watered out.
Place the strawberry pot in a sunny location (at least six hours of sun a day) and rotate it every few days so that each plant gets enough sunlight. Continue to water the plants every day. Containers tend to dry out much faster than a garden bed. If you planted everbearing or day neutral it is a good idea for the first few weeks to pinch off the blossoms when they flower. This gives the plant a chance to put its energy into establishing the roots and the plant itself before having to produce fruit.
Enjoy your beautiful pot and lots and lots wonderful strawberries!
I also love to grow herbs in strawberry pots. I'll save that for another post!
Father's Day Tablescape
Posted by
Unknown
at
3:55 PM
Wednesday, June 23, 2010
I set a pretty simple Father's Day table last Sunday. Nothing fancy and more toward the manly than most tables I set.
Dinner was just for 4.
I picked elements that would go well with these vintage amber colored candlewick glasses. I could not believe my good fortune when I found 4 of these at a Goodwill store in a neighboring town.
I have a very large collection of candlewick but didn't have any amber pieces until I found these. I LOVE amber glass.
Pretty sage green Laura Ashley plates.
Salad plates and soup bowls are TJMaxx finds.
Antique amber salt and pepper shakers.
Brown napkins are from the clearance aisle at Target. I fan folded them and then knotted in the middle for a casual look.
No flowers or pretty centerpiece for this table. Simply used some ironstone pieces that I had thrifted.
Sharing at Susan's Tablescape Thursday.
Labels:
The Farm Table
Mrs. Beeton's Book of Household Management
Posted by
Unknown
at
6:44 PM
Tuesday, June 22, 2010
Are you familar with Mrs Beeton? She was the authority on managing your household in Victorian Times.
A long time ago I picked up a *First Edition Facsimile* in a wonderful used bookstore located in an old log cabin in Harris, MN. This book has a very prominate place in my kitchen. I simply love this book. The book is now public domaine so I thought I'd share the link where you can read parts of the book for yourself....Mrs. Beeton's Book of Household Management
One of the things I found interesting was that Mrs. Beeton advocates eating local and seasonally....a very popular movement today. Although I doubt it was a movement in 1861....just the way things were.
I am posting the list for seasonal foods for June although I am not entirely sure what leverets or plovers are (I did google them, lol):
FISH.—Carp, crayfish, herrings, lobsters, mackerel, mullet, pike, prawns, salmon, soles, tench, trout, turbot.
MEAT.—Beef, lamb, mutton, veal, buck venison.
POULTRY.—Chickens, ducklings, fowls, green geese, leverets, plovers, pullets, rabbits, turkey poults, wheatears.
VEGETABLES.—Artichokes, asparagus, beans, cabbages, carrots, cucumbers, lettuces, onions, parsnips, pease, potatoes, radishes, small salads, sea-kale, spinach,—various herbs.
FRUIT.—Apricots, cherries, currants, gooseberries, melons, nectarines, peaches, pears, pineapples, raspberries, rhubarb, strawberries.
Postings to Sue's Rednesday (for the first time) and Suzanne's Vintage Thingie Thursday. BIG thanks to these lovely ladies for hostessing us!
Labels:
Book Reviews,
The Organized Farmhouse
Tea Time Magazine
Posted by
Unknown
at
7:30 PM
Saturday, June 19, 2010
I am a magazine nut. I really enjoy them. I think it stems from my first real job. I worked for a chain drug store with a LARGE magazine rack. On our breaks we were allowed to read the magazines as long as we were careful and didn't crease or soil the pages. Over the years, I've enjoyed many kinds of magazines...cooking, gardening, quilting, etc., One of my current favorites is Tea Time.
I sat down last week to go thru my newest issue (with a lovely cuppa, of course) and what do I see.
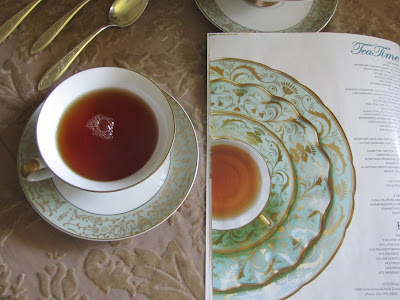
As I open the cover, there is MY cup of tea. Well, not exactly, that cup is from a set of Royal Crown Darby, but the styling is just the same as my Coronation by Tradition.
I picked these cups up a few months ago at a thrift store. I almost passed on them.
Not because I didn't like them, but because there were only 3 of them. I tend to *hunt* for things in multiples of 2. Just makes it easier for entertaining but in the end, I liked them so well, I broke my own rule and purchased all 3 of them.
Each and every piece of the of the Royal Crown Darby in the magazine is exquisite. I see the prices it list for though and am pretty contented with my little service for 3 (and my total investment of $3.75).
Speaking of exquisite, you have to check out the tea treats in this article. I will be trying Macadamia Sugar Cookies very, very soon!
Last weeks post with my thrifty silver inspired me to get the Silver Polish (Wright's cream) out. I even polished up my favorite tea spoons.
I bought these years ago at an Estate Sale. They are by Alvin and I have no idea what the pattern name is but I think they are sweet and love using them for tea (I have 6 of them).
Macadamia Sugar Cookies
Makes 2 dozen cookies
1 cup plus 6 tablespoons all-purpose flour
1/2 teaspoon baking powder
1/4 teaspoon salt
1/2 cup unsalted butter, softened
1/2 cup plus 1/3 cup granulated sugar
1 large egg
1 teaspoon vanilla extract
1/2 cup chopped macadamia nuts
2 cups chopped white chocolate, melted
1. In a medium bowl, sift together flour, baking powder, and salt. Set aside.
2. In a large mixing bowl, combine butter and sugar. Beat at medium speed with an electric mixer until light and fluffy, approximately 4 minutes. Add egg and vanilla, beating until combined. Add flour mixture, beating until just combined. Add macadamia nuts, stirring to combine. Cover and freeze until dough is firm, approximately 30 minutes.
3. Preheat oven to 350°.
4. Line 2 baking sheets with parchment paper. Set aside.
5. Using a 1-inch spring-loaded scoop, scoop dough into portions. Use hands to roll dough portions into balls. Place on prepared baking sheets.
6. Bake until edges are light brown, approximately 10 minutes. Transfer to a wire rack to cool completely.
7. Dip half of each cookie in melted white chocolate. Place on wire racks to dry.
Posting to Lady Kathrine's Tea Time Tuesday and Lisa's Tempt My Tummy Tuesday.
Skillet Suppers~Hillbilly Spaghetti Pie
Posted by
Unknown
at
12:23 PM
Thursday, June 17, 2010
I HAVE to tell you about my Aunt Ruthie and her Sugar Pie Farmhouse. I LOVE Ruthie's blog. She is a wonderful, encouraging soul and I do feel a kindred spirit with her although I have to admit to SERIOUSLY coveting her pantry! Ruthie is a apron wearing, cast iron cooking kind of gal. She posted this recipe for Hillbilly Spaghetti Pie months ago and I am just now getting around to trying it. Please don't take as long as I did. This recipe is perfect for weeknight cooking. I served with a simple salad and some fresh from the oven bread. I'm posting a picture of my finished product but recommend you head on over to Ruthie's for the photo, step-by-step, how-to!
Hillbilly Spaghetti Pie
(Printable Version)
1 bunch green onions, chopped
2 tablespoons olive oil
1/2 pound extra lean ground beef
1/2 pound Italian sausage, 4 links (sweet or hot) casings removed
4 garlic cloves, minced
3 tablespoons minced fresh parsley
1 (28 ounce) can crushed tomatoes
1/4 teaspoon red pepper flakes
1/4 teaspoon dried oregano
1 teaspoon salt (or to taste)
2 cups water
8 ounces spaghetti, broken into 3 inch pieces
1/4 cup heavy whipping cream
4 tablespoons chopped fresh basil
1/2 cup fresh grated Parmesan cheese
2 cups grated mozzarella cheese
Saute green onion in 2 tablespoons olive oil, on medium heat 5 minutes. Add beef and sausage, brown over medium-high heat. While almost brown, add garlic, pepper flakes, oregano, and parsley. Once browned, stir in crushed tomatoes, water and salt. Add broken spaghetti. Push spaghetti into liquid, and cover for 8 minutes. After 8 minutes, stir pasta so the noodles won’t stick together. Reduce heat to medium low simmer for 6 more minutes until pasta is al dente (almost cooked but still a little firm). Add basil, Parmesan cheese, and cream, stir well. Sprinkle top with mozzarella cheese, put in oven to broil until spotty brown. Serves 6.
Sharing today at Michael Lee's Foodie Friday.
Recent Vintage (Thrifty) Finds
Posted by
Unknown
at
4:20 PM
Wednesday, June 16, 2010
I've had really great fortune when thrift shopping lately. Wonderful vintage finds that will go into tablescapes very soon!
First up is a set of National Silverplate (with the name King Edward on it). The pattern is CALVALCADE (love that name) and it is from 1946. No serving pieces but I have 6 each of the knives, forks, spoons & soup spoons. A good set for my uses.
The second set I was not able to get as much information. The set is marked Wm. Rogers & Sons and it is my understanding that name was actually used by International in the early 1900's...the styling would suggest it is that old. Sadly there is not an even *set* of these, but there are enough for 5 place settings.
Click to enlarge a close-up of the spoon.
Both partial sets came in this box that seems to be the original box for the Wm. Rogers & Sons set.
The box is worn and scratched but I am glad to have it. The box and both partial sets were $10.00 at Goodwill.
Same trip to the GW netted these pink damask napkins. I've picked up a lot of pink lately so these will come in handy, Only 7 napkins for $4.00.
A few weeks back I visited GW, and found 4 of these boxes lurking under a table.
My heart about skipped a beat at the thought that the original dishes could possibly be in the boxes......not only were they, but 3 of the boxes had NEVER been opened!
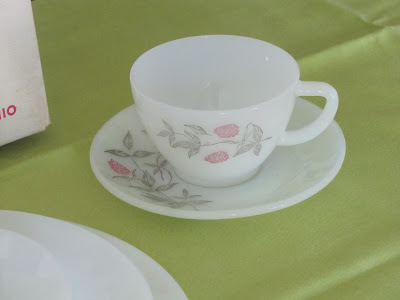
Inside was the sweetest little 5 piece place settings.....A plate, soup/salad bowl, dessert bowl and cup & saucer. I paid $3.00 per place setting!
The green tablecloth underneath is a lovely vintage green linen....and it has a stain right in the middle. Too bad but most of the fabric is still wonderful, so I will cut it up for napkins. I actually have a set of placemats I recently got at TJMaxx that are exactly the same color.
Stayed tune for tablescapes but in the meantime, visit all Suzanne's Vintage Thingie Thursday participants for lots more vintage fun!
Labels:
Around Faithfulness Farm
Americana Table Tops for Summer
Posted by
Unknown
at
4:55 PM
Monday, June 14, 2010
In a previous post, I promised to show off the top of my old upright grand piano all dressed up for summer. I LOVE red (I know I've said that before) and jump at the chance to add an Americana theme for the summer months.
I've shown off the cloche that is the centerpiece. This display also includes a pair of antique colbalt & milk glass oil lamps that my were bought me for my birthday many years ago when we were living in Longview, WA.
I've included one of my Warren Kimble 'Colonial' salad plates, a small basket and a set of masonary stars.
The tea stained flags are in a vintage blue glass vase with a frog top.
The transferware platter and small bowl are Goodwill finds by Harvest USA and Ridgeways (made in England and I suspect quite old but I haven't researched it).
A couple of the old hymnals I collect.
The top of my secretary/hutch in the dining room. The brown transferware tea pot is by California Pantry and became an instant favorite when it was found at GW. The beakers or mugs were added later. The tall oil lamp was my Great-Grandma's and started me on my way to a collection.
The cloche holds a small basket of ceramic eggs and sits on a wooden box, next to my Grandmother-in-Law's old Daisy churn. We have made a lot of butter in that beauty.
Tea anyone? I love my yellow barn star. It hangs in the dining room year-round.
My old radio, with some vintage goodies and tea stained flags. Recognize those old bottles?
Thanks to Marty @ A Stroll Thru Life and Lady Katherine's Tea Time Tuesday for hosting these wonderful Tuesday events each week!
Subscribe to:
Posts (Atom)