Showing posts with label Old-Fashioned Bake Sale. Show all posts

Sour Cherry Coffee Cake

Sunday, January 15, 2012

Daughter's baby shower was lovely and she received so many wonderful gifts. The food was all delicious. I spent a good part of the day today putting away all the catering goodies that I drug out to use. I kind of moved slowly knowing that this is my last full weekend at home for a while -- until the end of tax season to be exact. I start working 6 days a week this week. I'll miss my play time at home but I am so busy this time of year that it goes very quickly. After a nice long walk outside (an amazing January day in Nebraska), I enjoyed a leisurely coffee time this afternoon with a piece of the leftover coffee cake -- well, I ate about 2 bites of it and then was done....son came over helped me out with the rest of it :)

Sour Cherry Coffee Cake
(Printable Version)

Topping:
4 Tbsp unsalted butter, melted, plus more for dish
3/4 c all-purpose flour, plus more for dish
1/4 c granulated sugar
1/4 c packed light-brown sugar
1/4 c sliced almonds
1/4 tsp salt
1/4 tsp ground cinnamon
Cake:
1-1/2 c all-purpose flour
1 tsp baking powder
1/4 tsp salt
8 Tbsp (1 stick) unsalted butter, softened
3/4 c granulated sugar
2 large eggs
1 tsp pure vanilla extract
1/2 tsp almond extract
1/4 c buttermilk
2 c fresh sour cherries, pitted (I used frozen)

Preheat oven to 350° F. Butter a 9-inch round baking dish (I am used a spring form pan so as to be able to display it on a cake plate), dust with flour, tap out excess. In a medium bowl, stir together butter, flour, sugars, almond slices, salt, and cinnamon. Set topping aside. Whisk together flour, baking powder, and salt in a medium bowl. Using a stand mixer fitted with the paddle attachment, cream butter and granulated sugar until pale and fluffy. Beat in eggs, vanilla and almond extract. Working in alternating batches, add flour mixture and buttermilk, beginning and ending with flour. Beat until just combined. Pour into prepared dish, and smooth with an offset spatula. Dot top with cherries, and sprinkle with crumb topping. Bake until golden and a tester inserted into center comes out clean, about 1 hour. Let cool before cutting.

Old-Fashioned Bake Sale ~ Pumpkin Cheesecake

Friday, November 25, 2011

Trusting that everyone had a wonderful Thanksgiving Day! Ours was so very nice. I do have to say that going into this week was a little daunting for someone who is trying to lose weight. I was careful when planning the menu to make sure there was plenty that I could enjoy -- and I did. My goal was to maintain this week. When I did my weekly weigh-in this morning, the scale reported a loss of 1.2 pounds - I AM THRILLED!

Instead of making pies this year, there was a request for Pumpkin Cheesecake *like they have a Olive Garden*. I love making cheesecake but never had attempted a pumpkin version. I poured over lots of different recipes - then my issue of MaryJanesFarm came in (LOVE that magazine - it TOTALLY *gets me*)....it featured a beautiful photo and recipe for pumpkin cheesecake - my search was over. Not only was it simple looking but I could easily see how I could tweek it low carb for me. I made both version. The cheesecake got rave reviews and my low carb version was positively wonderful. I am sharing both today :)

(so it would be just like Olive Garden, I served the cheesecake with a mound of whipped cream and drizzled with caramel sauce)

Pumpkin Cheesecake
MaryJanesFarm Magazine
(Printable Version)

Crust:
1-1/2 cups gingersnap crumbs (I used Anna's Swedish Ginger Cookies instead)
4 Tbsp butter, melted

Filling:
2 8-oz packages cream cheese, softened
1 cup half n'half
1 cup pumpkin puree
3/4 cup sugar
4 eggs, separated
3 Tbsp flour
1 tsp vanilla
1 tsp ground cinnamon
1/2 tsp ground ginger
1/2 tsp nutmeg
1/4 tsp salt

Topping:
1 cup sour cream
2 Tbsp sugar
1/2 tsp vanilla
1/4 tsp ground nutmeg (my addition)

Preheat oven to 325°F. To prepare crust, combine crumbs with butter and press into bottom and 2" up the sides of a 9-inch springform pan. In a large bowl, beat cream cheese with electric mixer until soft; slowly add half n'half until mixture us smooth and fluffy. Add pumpkin puree, sugar, egg yolks, and next six ingredients; beat until smooth. In a separate bowl, beat egg whites until stiff. Fold egg whites into pumpkin mixture. Pour into prepared crust and bake until knife inserted in the center comes out clean, about 1 hour. In a small bowl, stir together sour cream, sugar, vanilla and nutmeg. Spread over cheesecake and bake 5 minutes longer. Remove from oven and let cook for 1/2 hour. Loosen sides of cheesecake from pan with a spatula. Cool 1/2 hour more. Remove sides of the pan and cool 2 hours longer. Cover and refrigerate at least 2 hours. Can be made 2 days in advance.

Gail's Low-Carb Version

1 8-oz package cream cheese, softened
1/2 cup heavy cream
1/2 cup pumpkin puree
1/3 cup Truvia sweetener (you could use Splenda)
2 eggs, separated
1/2 tsp vanilla
1/2 tsp ground cinnamon
1/4 tsp ground ginger
1/4 tsp ground nutmeg

Follow directions above for mixing - divide mixture evenly between 5 1-cup ramekins. Bake according to above. Allow to cool completely before refrigerating. Serve with a dollop of whipped cream sweetened with Truvia. Each ramekin is approximately 6 net grams of carbs and so VERY wonderful!

Posting to Michael's Foodie Friday and Kim's Sweet Indulgences Sunday!

Old-Fashioned Bake Sale ~ Amazingly Awesome Dinner Rolls

Thursday, November 17, 2011

It simply isn't Thanksgiving dinner without the homemade rolls at my house. There was a day when all my children were all at home, I made homemade rolls many times a week. Now they are only usually made when we have company or it is the holidays. Makes me kind of sad -- I love baking breads but cannot eat that way any longer so only for special occasions now. I guess I need to make sure we have plenty of special occasions :)


Amazingly Awesome Dinner Rolls
(Printable Version)

Makes 12 sandwich rolls or 18-24 dinner rolls

Ingredients

1 (2-1/4 tsp bulk) envelope active dry yeast
3 tablespoons sugar
1 1/4 cups warm whole milk
1/2 stick of room temperature unsalted butter, cut into pieces, plus more to rub on top of the loaf.
2 large eggs
1 large egg yolk
2 cups all-purpose flour
2 cups bread flour
2 tsp. salt

Directions:

Warm the milk and butter in microwave just until the butter begins to melt (butter doesn’t need to melt completely).

Combine the yeast, sugar, butter and milk in a small bowl and let sit until foamy, about 5 minutes.

In the bowl of a stand mixer fitted with the dough hook, add the milk, butter, yeast and sugar mixture, add the eggs and egg yolk, mix to combine.

Mixing on low speed, slowly add the flour and salt. Continue mixing until the dough is silky and springy, about 10 minutes.

Remove the dough to a lightly floured surface and lightly knead for 30 seconds. Place in a lightly oiled bowl, cover with clean tea towel or plastic wrap and let rise in a warm place for 1 hour or until doubled in bulk. Lightly punch down, cover and allow to rise for 30 minutes longer.

For sandwich rolls, roll dough out to approximately a ½ inch thick and cut into 12 equal pieces. For dinner rolls, divide dough into 18-24 equal pieces (depending on the size you want), roll, dip into melted butter and lay the cut or rolled dough balls into a metal 9×13-inch rimmed sheet pan. Brush the tops of sandwich rolls with melted butter. Cover lightly with plastic wrap or slightly dampened tea towel and let the dough rise about 1 hour.

Preheat the oven to 375 degrees F. Bake rolls in the center of the oven until golden brown.

Posting to Michael's Foodie Friday and Honey's Potpourri Party!

Old-Fashioned Bake Sale ~ Double Fudge Cream Cheese Bars

Thursday, November 10, 2011

Happy 11/11/11!

Last week was daughter's birthday. Good thing it wasn't this week -- it has be a CRAZY one!! Friday and Saturday I will be a busy bee selling my aprons and goodies at our local craft fair. Whew...I have been chained to my sewing machine and missing ALL that goes on in blogland. I'm looking forward to spending some of Sunday afternoon getting caught up with my blog reading :)

Jess' birthday treats was a old favorite at our house -- Double Fudge Cream Cheese Bars (also known as PMS Brownies at our house, lol)! She has always loved anything chocolate and LOVES cheesecake almost as much as her Momma! I cannot even tell you the first time we made these wonderful bars -- years and years ago. The recipe comes from my favorite blue Land O'Lakes Cookbook -- I am on my THIRD copy of this cookbook and my current copy is held together with a giant rubber band. Not a bad recipe in the lot :)


Double Fudge Cream Cheese Brownies
(Printable Version)

1 cup butter
4 (1-ounce) squares unsweetened baking chocolate
2 cups sugar
1-1/2 cups all-purpose flour
4 eggs, slightly beaten
2 tsp vanilla
1 tsp baking powder
1 tsp salt
1 cup semi-sweet chocolate chips
Filling:
1/4 cup sugar
1 (3-ounce) package cream cheese, softened
1 egg
1 Tbsp all-purpose flour
2 Tbsp butter, softened
1/2 tsp vanilla

Heat oven to 350°F. Line bottom of 13x9-inch baking pan with parchment paper, extending paper over pan edges. Set aside. Melt 1 cup butter and unsweetened chocolate in 2-quart saucepan over medium heat, stirring occasionally, until smooth (4 to 6 minutes). Stir in all remaining brownie ingredients except chocolate chips; mix well. Gently stir in chocolate chips. Spread half of batter into parchment paper-lined pan. Combine all filling ingredients in small bowl. Beat at medium speed, scraping bowl often, until creamy. Spread over brownie batter in pan. Spoon remaining batter over cream cheese mixture. (Some cream cheese mixture will show through batter.) Bake for 30 to 35 minutes or until brownie begins to pull away from sides of pan. Cool completely. Use edges of parchment paper lining to lift bars from pan. Place onto cutting board. Pull back edges of parchment for easy cutting; cut into bars. Store refrigerated.

Posting to Michael's Foodie Friday and Honey's Potpourri Party!

Old-Fashioned Bake Sale ~ Foolproof Pie Dough

Friday, November 4, 2011

Well, PIE season is about upon us. If you know me, you know that I ♥ pie. I've used a few different crust recipes over the years. My sweet grandmother-in-law always added a Tbsp of vinegar to hers (and I did for many years too) to suppress gluten formation and thus get a very flaky crust -- vodka does a better job. This is now the only recipe I use.

Anyone who knows me also knows that my FAVORITE is Cherry Pie!

Happy Pie Making!

Foolproof Pie Dough
(Printable Version)
Cook’s Illustrated 2007
- makes one 9-inch double-crust pie -

The trick to this pie crust is the inclusion of vodka. Eighty-proof vodka, which is 60 percent water and 40 percent alcohol, adds moistness to the dough without aiding in gluten formation since gluten doesn't form in ethanol. Although the recipe includes 8 tablespoons of liquid, the alcohol vaporizes during baking, resulting in a tender crust that only contains 6 1/2 tablespoons of water. Because of the extra liquid, the dough will be moister than most standard pie doughs and will require up to 1/4 cup more flour.

Ingredients
2 1/2 cups (12 1/2 ounces) unbleached all-purpose flour
1 teaspoon table salt
2 tablespoons sugar
12 tablespoons (1 1/2 sticks) cold unsalted butter, cut into 1/4-inch slices
1/2 cup cold vegetable shortening, cut into 4 pieces
1/4 cup cold vodka
1/4 cup cold water

Process 1-1/2 cups flour, salt, and sugar in food processor until combined, about 2 one-second pulses. Add butter and shortening and process until homogeneous dough just starts to collect in uneven clumps, about 15 seconds (dough will resemble cottage cheese curds and there should be no uncoated flour). Scrape bowl with rubber spatula and redistribute dough evenly around processor blade. Add remaining cup flour and pulse until mixture is evenly distributed around bowl and mass of dough has been broken up, 4 to 6 quick pulses. Empty mixture into medium bowl.
Sprinkle vodka and water over mixture. With rubber spatula, use folding motion to mix, pressing down on dough until dough is slightly tacky and sticks together. Divide dough into two even balls and flatten each into 4-inch disk. Wrap each in plastic wrap and refrigerate at least 45 minutes or up to 2 days.

Posting to Michael's Foodie Friday and Honey's Potpourri Party!

Old-Fashioned Bake Sale ~ Oreo Cupcakes

Friday, October 28, 2011

Before I get to today's featured recipe, I have a little business to get out of the way. Firstly, I want to show off the wonderful blog giveaway I won. The sweet Linda from Lemon Drop...her blog is FABULOUS and you should be following....hosted this giveaway of all these great baking goodies! Thank you Linda :)

Next, I have to tell you about the Apron Swap that Miss Sue from Country Pleasures hosted. Miss Sue is the Apron Queen. My swap partner was Xo from Apron Crazy (click to check out the apron I made her). She sent me the CUTEST Halloween apron and I plan to be wearing this weekend when my little friends come for lunch! Thanks Xo!! Oh, and in case you'd like to apron swap -- Miss Sue is taking names for her Chritmas Swap! Scoot over there and get signed up and SWAP with us :)

I've been playing with the idea of making an Oreo Cupcake for some time now. I've looked at dozens of versions -- some are based on white cake and others chocolate -- some place a whole Oreo into the bottom, others pull them apart and just put in a portion of the cookie and others yet add crumbs to the batter. I decided I liked elements of several recipes so created a hybrid of my own. I took a practice version batch into work and got scolded by my boss who claims to be dieting, -- he ate one anyway, lol!


Oreo Cupcakes w/Oreo Cream Cheese Frosting
(Printable Version)

6 ounces bittersweet chocolate, chopped fine
2/3 cups Dutch-processed cocoa
1-1/2 cups hot, strong-brewed coffee
1-1/2 cups all-purpose flour
1-1/2 cups granulated sugar
1 tsp salt
1 tsp baking soda
3/4 cup melted butter
3 large eggs
4 tsp white vinegar
2 tsp vanilla extract

Preheat the oven to 350°F and line a muffin pan with cupcake liners. Place 1 whole Oreo cookie into the bottom of each lined cupcake line. Place chocolate and cocoa in a medium bowl and pour hot coffee over the mixture. Whisk until smooth and transfer to the refrigerator to cool completely, 20-30 minutes. Whisk flour, sugar, salt, and baking soda together in a medium bowl; set aside. Whisk melted butter, eggs, vanilla, and vinegar into the cooled chocolate mixture until smooth. Add flour mixture and whisk until batter is smooth. Divide batter evenly among muffin pan cups, filling each 3/4 full. Bake until cupcakes are set and firm to the touch, 17-19 minutes. Allow to cool in pans 10 minutes, before transferring to a wire rack to cool completely.


Oreo Cream Cheese Frosting

1 8oz pkg cream cheese, softened
1 cup butter, softened
2 tsp vanilla extract
Dash of salt
3-4 Tbsp cream (1/2 & 1/2, milk or evaporated milk will work fine)
6-8 cups confectioners’ sugar
1/2 cup crushed Oreo’s (I do a whole package at a time in my food processor and then freeze the crumbs to use in recipes).

Combine the cream cheese and butter in the bowl of an electric mixer. Beat on medium-high speed until well combined and smooth, about 2-3 minutes.
Mix in the vanilla extract and cream. Gradually beat in the confectioners' sugar until totally incorporated. Add crushed Oreo’s increase the speed and then beat until smooth. Generously frost cooled cupcakes as desired. Garnish each cupcake with 1/2 an Oreo cookie.

Makes 24 cupcakes.

Posting to Michael's Foodie Friday and Honey's Potpourri Party!

Old-Fashioned Bake Sale ~ Candy Corn Cut-out Cookies

Thursday, October 20, 2011

Today's baking is for a very special purpose -- a benefit for Miss Aria. These goodies will be served to the helpers and donors. Please pray that they have a great turn-out as well as for Aria and her recovery. Thank-you!

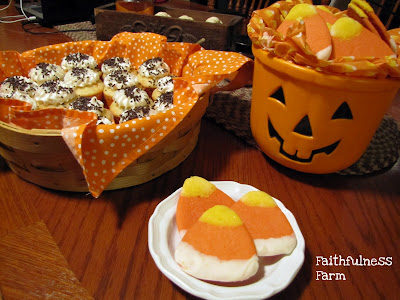
I used some shortcuts and semi-homemade methods for making these little lovelies. I first saw this idea last year in Country Living magazine and was re-acquainted with it thru Pintrest. I thought with as many kids as will show up for the benefit, this would be a perfect time for making them.

Photo credit

Candy Corn Cookies
No one will guess these elegant cookies were made with refrigerated dough. Go ahead, let this simple shortcut remain your secret. To make this treat, knead extra flour and orange food coloring into refrigerated sugar-cookie dough (I used 2 regular sized rolls of cookie dough and 1/2 cup all-purpose flour - it was easiest to allow it to come to room temperature, put it in the mixer bowl with coloring and flour and mix - and then into the refrigerator to chill down before rolling out). Use a triangle-shaped cutter; bake and let cool. Dip the wide base of each cookie into melted dark chocolate, then dip the tips into melted white chocolate (I used almond bark for both ends). Set on a parchment-lined baking pan and chill in freezer for 5 minutes.


Important reminder, if you are wanting to color your almond bark or white chocolate, you must add the coloring prior to melting -- waiting until after can result in seizing -- I KNOW that for sure. After 2 unsuccessful attempts, I decided to use yellow sanding sugar instead of yellow food coloring :)

Posting to Michael's Foodie Friday and Honey's Potpourri Party!

Old-Fashioned Bake Sale ~ Cheddary Cheese Crackers

Saturday, October 15, 2011
This post was all prepared and then something happened -- 4 of the most wonderful little children came to spend the night at my house -- ages 3 months to 5 years! Oh, did we have fun. So I'm changing the post a little and adding some photos. Sorry for being a tad late posting!

Have you ever made cheese crackers, pennies or straws? They really are very simple and so yummy. Perfect to serve on the side of a soup supper OR as the favorite snack of kids far and wide.

Using my birthday gift!

Cheddary Cheese Crackers
(Printable Version)

Makes about 70 1-inch square crackers
1-1/2 cups grated extra-sharp Cheddar cheese
4 Tbsp (1/2 stick) unsalted butter, softened and cut into pieces
3/4 c flour, plus more for dusting
1/2 tsp salt
1/2 tsp crushed red pepper flakes (optional - I don't use if I am making for kids)
1 Tbsp milk

Preheat oven to 350˚F. Put everything except the milk in a food processor. Pulse the processor, 5 seconds at a time, for about 5 or 6 times, until the dough is in coarse crumbs. Add the milk and process until the dough gathers together in a ball. Roll the dough out on a floured board with a rolling pin that has been floured until it is about 1/8 inch thick. Cut the dough into 1-inch squares with a sharp knife or pizza cutter.

You can put a bit of flour on the blade of the knife to keep it from sticking. Use the flat end of a wooden skewer to poke a hole in the center of each cracker. Place the crackers at least 1/4 inch apart on parchment paper on a baking sheet. Bake for 12 – 15 minutes until the edges are just starting to brown. Put the baking sheet on a rack and let the crackers cool completely. Eat! Or store in a covered container to eat within a day or two.
(I recently found this sweet vintage apple butter jar - and her little brother, a relish jar at an estate sale for 10 cents each - isn't it so cute)


The Cody seal of approval!

He also REALLY liked the Hot Chocolate (with marshmallows) from the Keurig -- his sippy cup kept showing up waiting for more!

Old-Fasioned Bake Sale ~ Caramel-Pecan-Pumpkin Bread Pudding

Thursday, October 6, 2011

Okay, bread pudding probably is a stretch for a bake sale but the fact that these are individual servings brings into the realm of MY possiblities :)

So now it is confession time -- I haven't made this recipe YET. I am having company this weekend and this recipe is from my Pinterest to-try folder. How can you go wrong with bread pudding, pumpkin AND caramel -- simply has to be YUMMY (HOPING my company thinks so)!! Since I didn't have anything else prepared for this week, I figured I'd just go ahead and share the recipe a week earlier than I had actually planned to and we can all try it together. I'll report back after the weekend :)

Happy Baking!!

photo credit: Southern Living


Caramel-Pecan-Pumpkin Bread Pudding
(Printable Version)

BREAD PUDDINGS:
4 large eggs
2 (15-oz.) cans pumpkin
1 1/2 cups milk
1 cup half-and-half
1 cup granulated sugar
1 teaspoon ground cinnamon
1/2 teaspoon salt
1/2 teaspoon ground nutmeg
1/2 teaspoon vanilla extract
1 (12-oz.) French bread loaf, cut into 1-inch pieces (about 10 cups)

CARAMEL-PECAN SAUCE:
1 cup pecans, chopped
1 cup firmly packed light brown sugar
1/2 cup butter
1 tablespoon light corn syrup
1 teaspoon vanilla extract

Prepare Bread Puddings: Whisk together eggs and next 8 ingredients in a large bowl until well blended. Add bread pieces, stirring to thoroughly coat. Cover with plastic wrap, and chill 8 to 24 hours. Preheat oven to 350°. Spoon bread mixture into 11 (6-oz.) lightly greased ramekins. (Ramekins will be completely full, and mixture will mound slightly.) Place on an aluminum foil-lined jelly-roll pan. Bake at 350° for 50 minutes, shielding with foil after 30 minutes. During last 15 minutes of baking, prepare Caramel-Pecan Sauce: Heat pecans in a medium skillet over medium-low heat, stirring often, 3 to 5 minutes or until lightly toasted and fragrant. Cook brown sugar, butter, and corn syrup in a small saucepan over medium heat, stirring occasionally, 3 to 4 minutes or until sugar is dissolved. Remove from heat; stir in vanilla and pecans. Remove bread puddings from oven; drizzle with Caramel-Pecan Sauce. Bake 5 minutes or until sauce is thoroughly heated and begins to bubble.

Sharing at Honey's Potpourri Party AND Miss Michael's Foodie Friday!

Old-Fashioned Bake Sale ~ Salted Caramel Butter Bars

Friday, September 30, 2011

If you haven't already, enter to win TINY TIPS from Gooseberry Patch -- ends Monday 10/3.

I was determined that this week's baking feature would be a recipe from my Pintrest to-try list. After looking over all that was PINNED my daughter declared she wanted to take goodies to the girls at work on Friday -- How about bars? Yeah, I have an occasion to try Salted Caramel Butter Bars from www.cookiesandcups.com. One thing I want to say is that I *think* I may have invented the salted caramel craze many years ago. I figured why make caramel apples (my oldest daughter's favorite treat) when I could just make homemade caramels and eat them with a cut up apple sprinkled with SALT -- YUM!! Okay, so not my invention but I will say that there is *something* about caramel combined with salt.


My sampling of these bars made me VERY glad they had a place to go -- too good to be trusted around. This also makes A LOT -- you might want to plan on baking them when you have plenty around to share with. Happy Baking (and Pinning too)!!


Salted Caramel Butter Bars
(Printable Version)

For the Crust:
1 lb. salted butter room temp (I used unsalted - it is what I buy)
1 cup sugar
1½ cups powdered sugar
2 Tbs vanilla
4 cups flour
For the Filling:
1 bag (14 oz.) caramel candies (about 50 individual caramels), unwrapped
1/3 cup milk or cream (I used cream)
½ teaspoon vanilla
1 Tbsp coarse sea salt (optional)

In a large bowl, combine the butter and sugars. Using mixer on medium speed, beat together until creamy. Add the vanilla and beat until combined. Sift the flour into the butter mixture and beat on low speed until a smooth soft dough forms. Spray a 9×13 inch baking pan lightly with non-stick cooking spray. Press one-third of the dough evenly into the pan to form a bottom crust. Preheat to 325°F. Bake until firm and the edges are a pale golden brown approx 20 minutes. Transfer pan to a wire rack and let cool about 15 minutes. While the bottom crust is baking and the remaining dough is chilling, make the caramel filling. Place the unwrapped caramels in a microwave-safe bowl. Add the cream. Microwave on high for 1 minute. Remove from the microwave and stir until smooth. If caramels are not completely melted, microwave on high for 30-second intervals, stirring after each interval, until smooth (I did the melting in a saucepan stovetop since I don't microwave). Pour the caramel filling over the crust. If you are going to salt the caramel sprinkle it on caramel layer now. Remove the remaining chilled dough from the refrigerator and crumble it evenly over the caramel. Return the pan to the oven and bake until the filling is bubbly and the crumbled shortbread topping is firm and lightly golden, about 25 – 30 minutes. Let cool before cutting into squares.

Sharing at Michael Lee's Foodie Friday and Kim's Sweet Indulgence Sunday AND Yvonne's On The Menu Monday!

Old-Fashioned Bake Sale ~ Pumpkin Doughnut Muffins

Friday, September 23, 2011

I never repeat posts or recipes -- well, until today that is. Last fall, I discovered this wonderful recipe in Martha Stewart's Everyday Food. My family was hooked. I've made them many. many times since then and made them to bring to work today to celebrate the arrival of Fall.


Pumpkin Doughnut Muffins
(Printable Version)

10 Tbsp butter, room temperature
3 c all-pupose flour
2-1/2 tsp baking powder
1/4 tsp baking soda
1 tsp salt
1/2 tsp nutmeg
1/4 tsp allspice
1/3 c buttermilk
1-1/4 c pure pumpkin puree
3/4 c light brown sugar
2 large eggs

sugar coating:
3/4 c granulated sugar
1-1/2 tsp cinnamon
1/4 c butter, melted

Preheat oven to 350°F. Butter and flour 12 standard muffin cups. Make batter: In medium bowl, whisk together flour, baking powder, baking soda, salt, nutmeg, and allspice. In a small bowl, whisk together buttermilk and pumkin puree. In a large mixing bowl, using an electric mixer, beat butter and brown sugar until light and fluffy. Beat in eggs, one at a time, scraping down bowl as needed. With mixer on low, add flour mixture in three additions, alternating with two additions pumpkin mixture; and beat to combine.

Spoon 1/3 cup batter into each muffin cup and bake until a toothpick inserted into center of muffin comes out clean, about 30 minutes. Meanwhile, in a medium bowl, combine granulated sugar and cinnamon. Let muffins cool 10 minutes in pan on wire rack. Working with one at a time, remove muffins from pan, brush all over with melted butter, then toss to coat in sugar mixture. Let muffins cool completely on a wire rack. Makes 12 muffins.

Posting to Honey's Potpourri Friday & Michael Lee's Foodie Friday!

Old-Fashioned Bake Sale ~ Banana Bundt w/Caramel Glaze & Candied Walnuts

Friday, September 16, 2011
One of my favorite kitchen collections is my Nordicware Bundt pans. I try to use them as much as possible. Bundt cakes are fun and so easy -- no frosting and decorating necessary. Perfect for something quick for company or to go with a steamy cup of coffee. This recipe fits that bill perfectly!


Banana Bundt Cake w/Caramel Glaze & Candied Walnuts
(Printable Version)

Cake:
1-1/2 cup sugar
1 cup sour cream
2 eggs
4 Tbsp butter, softened
4 mashed super ripe bananas (about 1-1/2 cups)
1 tsp pure vanilla extract
2 cups flour
1/2 tsp salt
1 tsp baking soda

Caramel Glaze
Candied Walnuts (commercially prepared ones can be used)

Prepare candied walnuts. Position rack in center of oven. Preheat oven to 350°F. Prepare a 10-1/2-cup Bundt pan by using a pastry brush to brush the inside surface with solid shortening then dust with flour. Set aside. With a mixer, cream together sugar and softened butter. Add eggs one at a time and beat until well incorporated. In a medium mixing bowl, mash bananas. Add vanilla and sour cream. Combine flour, salt and baking soda. Add flour mixture to creamed mixture alternating with banana mixture (beginning and ending with dry ingredients) until well combined. Do not over mix. Pour into prepared Bundt pan. Bake for 45-50 minutes, until a skewer inserted into the center comes out clean. Cool on rack for 5-10 minutes, then turn cake out onto serving plate. Cool completely. When cooled, prepare glaze and pour over cake. Sprinkle glaze with chopped candied walnuts. Serves 12.

Caramel Glaze:
4 Tbsp butter
1 cup brown sugar, packed
1/4 cup evaporated milk
1 tsp vanilla

Bring brown sugar, butter, and milk to a boil in a 2-qt. saucepan over medium heat, whisking constantly; boil 1 minute, whisking constantly. Remove from heat; stir in vanilla. Whisk for 3 to 5 minutes or until mixture begins to cool and thickens slightly. Pour immediately over cooled cake.

Candied Walnuts:
½ lb walnuts halves
½ c granulated sugar
1/8 tsp salt
1 tsp ground cinnamon
3 Tbsp evaporated milk
1/2 tsp vanilla

Preheat oven to 350°F. Spread nuts in a single layer over parchment-lined baking sheet. Roast for approximately 8 to 10 minutes, or until the nuts start to turn brown and the smell of roasting nuts fills the kitchen. Stir together sugar, cinnamon, salt, and milk in a medium saucepan. Cook over medium-high heat for 6-8 minutes, or until the mixture reaches the soft ball stage of 236°F. Remove from heat, and stir in vanilla immediately. Add walnuts to syrup mixture, and stir to coat well. Spoon nuts back onto parchment-lined baking sheet, and immediately separate nuts with a fork. Cool, and store in airtight container.

Posting to Honey's Potpourri Friday & Michael Lee's Foodie Friday!

Old-Fashioned Bake Sale ~ Gingerbread Pumpkin Bars

Thursday, September 8, 2011

It is September -- no more holding back -- Fall is so close I can smell it (and it smells like pumpkins and spices)-- BRING ON THE PUMPKIN RECIPES :)


Gingerbread Pumpkin Bars
(Printable Version)

Bars:
2-1/4 cups flour
1-1/2 tsp baking soda
1/2 tsp salt
1-1/2 tsp pumpkin pie spice
16 Tbsp unsalted butter, softened
1-1/2 cups granulated sugar
1/4 cup molasses
1/3 cup rolled quick oats

Filling:
6 ounces cream cheese, softened
1-3/4 cups pumpkin puree
1/2 cup granulated sugar
1 teaspoon vanilla
1-1/2 tsp pumpkin pie spice
2 large eggs

Glaze drizzle:
1 cup confectioners' sugar
1 tablespoon butter, softened
1/4 teaspoon vanilla
1 to 2 tablespoons milk

Preheat oven to 350°F. In a medium bowl, whisk together flour, baking soda, salt, pumpkin pie spice. In a large mixing bowl, beat together butter, sugar and molasses until creamy. Add dry ingredients and mix just until combined. Reserve 3/4 cup of this mixture and place in a small bowl. Scoop the remaining mixture into a 10" x 15" baking pan lightly coated with nonstick spray. Add the oats to the reserved mixture and mix until combined - set aside. For the filling, in a large mixing bowl, beat cream cheese until smooth. Add pumpkin, sugar, vanilla, pumpkin pie spice and mix until well combined. Add the eggs, one at a time, mixing just until combined. Scoop the mixture over the uncooked base and use an off-set spatula to evenly spread the mixture over the top. Crumble reserved oat mixture over filling. Bake until the topping is a golden brown, about 25-30 minutes. Remove and place on a wire rack to cool completely. For glaze drizzle, in a small bowl, mix together confectioners' sugar, butter and vanilla. Mix in just enough milk until the mixture will easily flow from a spoon - drizzle over cooled bars.

Old-Fashioned Bake Sale ~ Honey-Bun Cake

Friday, September 2, 2011

Quick reminder - We will be doing the Old-Fashioned Bake Sale GIVEAWAY drawing on Monday -- if you haven't entered in, RUN, don't walk and enter HERE!!

If you haven't guessed, I am a sharer -- you know, one who shares, lol. That includes my recipes -- in fact, I love sharing a new recipe with a friend. I think most cooks are the same way. I have only had 2 people refuse to share a recipe I've asked them for -- one was my friend Cathy and her wonderful Streuseled Topped Sweet Potatoes, which is a favorite of my kids. I understand her reasoning -- we attended a small church and that dish was her speciality -- she didn't want it showing up at potlucks made by someone other than her. Once we moved to Nebraska, she happily shared the recipe (my kids were THRILLED). The other recipe is for something called Honey Bun Cake -- my current Pastor's Wife's specialty. I don't plan to move anytime soon, so I knew if I wanted that recipe, I was going to have to get it from Google. I looked at several versions and tweeked the one I choose (I decided it would have a richer flavor made with butter instead of oil - don't I sound like Miss Paula, lol - and the addition of a little nutmeg sounded perfect) and came up with one my family (and the folks I work with) were thrilled with. Try it -- it will be a potluck hit for sure!


Honey Bun Cake
(Printable Version)

1 pkg yellow or butter cake mix
2 sticks (1 cup) butter, softened
4 eggs
1-8 oz container sour cream
1/2 cup brown sugar
2 tsp ground cinnamon
1/2 tsp nutmeg
1 cup powdered sugar
1 Tbsp milk
1 tsp vanilla

Heat oven to 350°F. Generously grease the bottom of a 9 x 13 pan. Remove 1/2 cup dry cake mix, reserve. Beat remaining dry cake mix, butter, eggs and sour cream in large bowl on medium speed 2 minutes, scraping bowl occasionally. Spread half of the batter in pan. Stir together reserved dry cake mix, brown sugar, cinnamon and nutmeg; sprinkle over batter in pan. Carefully spread remaining batter evenly over cinnamon mixture. (To make spreading easier, drop batter by dollops over cinnamon mixture, then spread carefully with an offset spatula.) Bake 40-45 minutes or until deep golden brown and cake springs back when lightly touched in center. Stir powdered sugar, milk and vanilla until thin enough to drizzle, stirring in additional milk , 1 tsp. at a time if necessary. Poke top of warm cake several times with fork; spread over top of cake. Cool completely, about 1 hour. Store covered. Serves 12 (or 6 if everyone likes this as much as my bunch does, lol).


Old-Fashioned Bake Sale ~ Grandma's Apple Butter Cake & Welcome Home Brands & A GIVEAWAY!!!!

Thursday, August 25, 2011

A few weeks ago I was at the mall with #1 daughter. We strolled through Auntie Em's. I LOVE going in there but found an unexpected treat on that day -- Paper Bakeware from WELCOME HOME BRANDS. I purchased some of the little loaves and muffin tops and brought them home and used them almost right away. Oh, I just loved not only the convenience of the product BUT how lovely my baked goodies looked in these sweet papers. I found the company webpage and sent them an email asking for (read that UNASHAMEDLY BEGGING for) some more of their wonderful product for review AND giveaway to my lovely readers. They quickly sent me out a sampling of their wonderful products and something special for the giveaway. All I can say, is you gotta get yourself some for fall and holiday baking -- they are perfect for your baking that is intended for gift giving and of course they'd be PERFECT for bake sale goodies! Very convenient....no pans to prepare or clean up after......keeps the messies out of baking. Thank you WELCOME HOME BRANDS! Wonderful, wonderful products!! If there is not a retailer in your area that sells these great products, they are available at Amazon.

My Grandma Mae was a BAKER EXTRAORDINAIRE! Her specialty was cakes. I remember people always commenting on how she made the BEST cakes. One of her specialties was what she called Applesauce Cake -- it was always my Mom's favorite cake. I don't have Grandma's actual recipe since ALL of her recipes were in her head but I've made my own version that Mom says it is just about as good. Mom and I both know Grandma's secret ingredient -- APPLE BUTTER!!

Grandma Mae’s Apple Butter Cake
(Printable Version)

1 pkg yellow cake mix (without pudding in the mix)
1 pkg (4 serving size) vanilla instant pudding mix
3 eggs
1 cup sour cream
1 cup apple butter
1 stick butter, melted
¼ c water
2-3 tsp apple pie spice (see recipe below)
1 cup pecans, toasted (optional)

Preheat oven to 375°F. Spray 10-inch tube pan with nonstick cooking spray. Beat cake mix, pudding mix, eggs, sour cream, apple butter, water, melted butter, nuts and spice in large bowl with electric mixer at low speed 1 minute. Beat at medium speed 2 minutes or until well blended and fluffy. Pour batter into prepared pan. Bake 45 to 50 minutes or until toothpick inserted near center comes out clean. Cool in pan on wire rack 20 minutes. Run sharp knife along edge of pan to release cake from pan; invert cake onto serving plate. Cool completely.
I have baked this cake in layers (if you remember last year when I made my Mom & Dad’s 50th Anniversary Cake – it was THIS cake) and in loaves. It is very versatile – you will have to adjust the baking time accordingly. To serve, you can simply sprinkle with powdered sugar, dollop with fresh whipped cream, ice or glaze with a simple glaze or vanilla buttercreme BUT my favorite is icing it with cream cheese frosting Y-U-M!!!

Apple Pie Spice
(Printable Version)

1/4 cup ground cinnamon
1 tbsp ground allspice
2 tsp ground nutmeg
1/2 tsp ground cardamom (optional)

Pumpkin Pie Spice
(Printable Version)

1/4 cup ground cinnamon
2 tbsp ground ginger
2 tsp ground cloves
1 tsp ground nutmeg
1/2 tsp ground cardamom (optional)

Combine all ingredients for desired mix and blend well. Store in a small, airtight container. Feel free to experiment with amounts to get a blend that works for you.

So, now the important stuff, GIVEAWAY TIME!! This is a celebration giveaway. What are we celebrating? -- well, let's see -- August is the 2 Year Anniversary of Faithfulness Farm -- 300 Posts (okay, I am at 298 posts but close enough, lol) -- and MOST IMPORTANTLY, My LOVE of BAKING!!

Here are the details of the Old-Fashioned Bake Sale Giveaway -- it includes 2 packages of WELCOME HOME BRANDS products, a Faithfulness Farm Vintage-Inspired Apron and Set of Embellished Dish Towels, a little mason jar of both the Apple Pie & Pumpkin Pie spice mixes and The Bake Sale Cookbook (isn't that just perfect). You have 3 EASY opportunities to enter -- 1. Comment on this post (remember to leave a email address so I can contact you), 2. Follow Faithfulness Farm Blog (let me know in a separate comment that you follow) AND 3. Blog about Old-Fashioned Bake Sales and this giveaway (let me know that in separate comment too). We'll have a drawing of all the entries and announce the winner on LABOR DAY September 5th!


Editing to participate in my dear friend Yvonne's On The Menu Monday Party!!

Old-Fashioned Bake Sale ~ A Little Help From My Friends

Thursday, August 18, 2011

Remember the old Beatles song ---

Oh, I get by with a little help from my friends,
Mmm, gonna try with a little help from my friends
Yes I get by with a little help from my friends,
with a little help from my friends...........

This week got away from me with no baking AT ALL. Here I go offering excuses....I think it a good excuse, but still an excuse, lol...my sweet friend at work was getting her daughter ready to go off to college so I covered for her and worked more hours than I planned to (and didn't take my usual Thursday off). I had plans to do a wonderful (baking) product review and kick-off my giveaway (which will include aformentioned (baking) product). SO, instead of rushing thru, I am working on that post for NEXT Friday and this week am going to share what my SWEET friends have baking in their kitchens. All of these gals are top-notch bakers and these recipe all would be perfect for bake sale fare or a sweet treat for your family and friends!

Thank you Kim, Lynn, Linda, Tina and Linda! Be sure to check in with me next friday for a great product review, a 2011 update of one of my Grandma's tried and true recipes AND a giveaway!!

Chocolate Chip Cheesecake from Kim @ A Well-Seasoned Life


Lemon Zucchini Bread from Lynn @ Happier Than A Pig in Mud


Oreo Cupcakes From Linda @ Lemon Drop


White Chocolate Cherry Sweet Bread from Tina @ Mommy's Kitchen

Apple Slab AND
Strawberry Lemonade Scones from Linda @ Prairie Flower Farm